Categories
Uncategorized

How to Place an Iron Condor Order With Lumibot?

Introduction

In the realm of options trading, there are a multitude of strategies available to fit different market scenarios and trader objectives. One of the more popular strategies, especially during periods of low volatility, is the Iron Condor. This advanced options strategy is known for its ability to generate consistent returns with limited risk. However, executing and managing an Iron Condor position manually can be time-consuming and error-prone, especially for traders with multiple positions or complex portfolios. This is where Lumibot, an algorithmic trading platform, becomes a game-changer.

Lumibot empowers traders to automate the execution of advanced strategies like the Iron Condor, eliminating manual effort and ensuring that trades are placed systematically based on predefined criteria. 

In this blog, we’ll take a detailed look at how you can place an Iron Condor order using Lumibot, what the strategy entails, and how to optimize its use for your trading objectives.

What Is an Iron Condor?

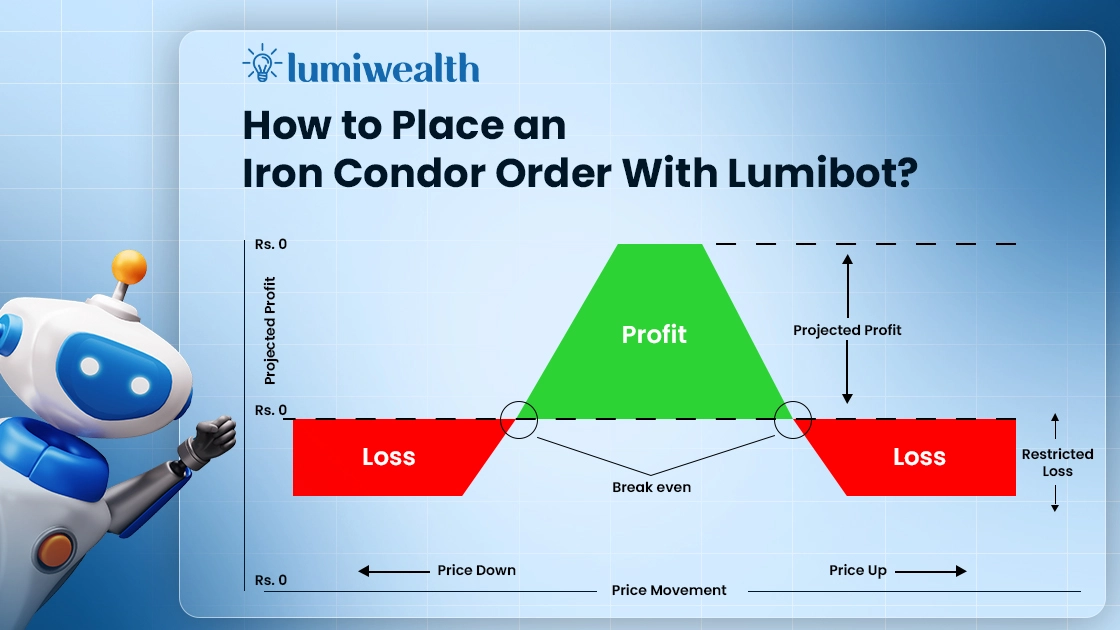
An Iron Condor is an advanced options strategy that allows traders to profit from a stock or index that is expected to have low volatility. It involves the simultaneous selling of two option spreads: a bull put spread and a bear call spread. This creates a “range-bound” strategy where the trader expects the price of the underlying asset to stay between two strike prices until the options’ expiration date.

The overall goal of an Iron Condor is for the stock or index to stay between the two middle strike prices (A and C) by the time the options expire. The strategy is designed to take advantage of the time decay in options pricing (theta), meaning you benefit if the options lose value as the expiration date nears and the price stays within a defined range.

Why Use Lumibot for Iron Condor Trading?

Trading an Iron Condor manually, while effective, can be time-consuming and may require frequent attention, especially as market prices change or expiration dates approach. This is where Lumibot offers a clear advantage. Lumibot is an algorithmic trading platform that allows you to automate your Iron Condor strategy, saving you time and improving execution accuracy. Here are some of the key benefits of using Lumibot for Iron Condor Trading: 

1. Automated Execution

With Lumibot, once your strategy parameters are set (strike prices, expiration dates, risk levels), the platform automatically places the trades for you. This means you don’t need to be constantly watching the markets to ensure your strategy is executed correctly. Automation also helps eliminate human error in placing trades, ensuring precision with every order.

2. Backtesting Capabilities

One of Lumibot’s core strengths is its ability to backtest strategies using historical data. You can evaluate how an Iron Condor strategy would have performed in different market environments before committing real capital. This allows you to fine-tune the parameters (strike distances, expiration dates, etc.) for better results based on past performance.

3. Live Trading with Multiple Brokers

Lumibot connects with popular brokers like Interactive Brokers, Alpaca, and TD Ameritrade, allowing seamless integration with your existing trading account. Once connected, you can deploy your Iron Condor strategy in real-time, with Lumibot managing the trades on your behalf.

4. Customization and Flexibility

The beauty of Lumibot lies in its flexibility. Whether you’re new to options trading or a seasoned pro, Lumibot allows you to fully customize your trading logic. From defining profit-taking rules to setting up automatic exit strategies when your position hits a certain threshold, you can build a strategy that aligns with your risk tolerance and trading goals.

5. Efficiency in Trade Management

Managing multiple legs of an Iron Condor position can be overwhelming. Lumibot simplifies this by providing real-time monitoring of your positions and automatically executing adjustments based on market conditions. Whether you need to close one leg, roll a position to a new expiration date, or exit the entire trade, Lumibot does it all programmatically.

    Overall, Lumibot empowers you to focus on strategy optimization while it handles the tedious tasks of executing and managing trades.

    A Step-by-Step Guide to Placing an Iron Condor Order With Lumibot

    Step 1: Import Necessary Classes

    The code starts by importing necessary modules to define the strategy and interact with time and asset entities. This sets up the foundation by bringing in essential classes like Strategy and Asset that will be used to define and execute the trading algorithm.

    from datetime import datetime
    from lumibot.strategies.strategy import Strategy
    from lumibot.entities import Asset

    Step 2: Parameters Setup

    Within the IronCondorStrategy class, a dictionary called parameters is defined. This dictionary contains the options strategy setup: the stock symbol (e.g., SPY), expiration date, strike prices for the calls and puts, and the quantity of contracts. These parameters define the four legs of the Iron Condor and the amount of contracts to be traded.

    class IronCondorStrategy(Strategy):
        parameters = {
            "symbol": "SPY",  # Underlying stock symbol
            "expiration_date": "2024-01-19",  # Option expiration date
            "short_call_strike": 155,  # Strike price for short call
            "long_call_strike": 160,   # Strike price for long call
            "short_put_strike": 145,   # Strike price for short put
            "long_put_strike": 140,    # Strike price for long put
            "quantity": 1               # Number of contracts for each leg
        }

    Step 3: Initialize Function

    In the initialize method, the sleeptime variable is set. This determines how often the strategy will run, in this case, every day (“1D”). This setup ensures that the strategy will execute daily to monitor the market or manage positions.

     def initialize(self):
            self.sleeptime = "1D"  # Adjust as needed

    Step 4: On Trading Iteration

    This function is called during each iteration of the strategy (daily, in this case). It performs the core functions like setting the current date/time and defining the four legs of the Iron Condor. This part of the code defines the four legs of the Iron Condor:

    • Short call option (Sell call)
    • Long call option (Buy call)
    • Short put option (Sell put)
    • Long put option (Buy put)

    Each Asset object is created with the stock symbol (SPY), option expiration date, strike price, and whether it’s a call or put option.

    def on_trading_iteration(self):
            """Places an Iron Condor once and manages the position"""
    
            # Get current time and default expiration date to today
            current_time = self.get_datetime().date()
            self.log_message(f"Current datetime: {current_time}")
            
            # Set expiration date to today
            expiration_date = current_time
    
            # Fetch the current price of the underlying asset
            underlying_asset = Asset(
                symbol=self.parameters["symbol"],
                asset_type=Asset.AssetType.STOCK
            )
            underlying_price = self.get_last_price(underlying_asset.symbol)
    
            # Automatically determine the strike prices
            short_call_strike = round(underlying_price * 1.05, 2)  # Short call strike 5% above current price
            long_call_strike = round(underlying_price * 1.10, 2)   # Long call strike 10% above current price
            short_put_strike = round(underlying_price * 0.95, 2)   # Short put strike 5% below current price
            long_put_strike = round(underlying_price * 0.90, 2)    # Long put strike 10% below current price
    
            # Define the four legs of the Iron Condor
            short_call = Asset(
                symbol=self.parameters["symbol"],
                asset_type=Asset.AssetType.OPTION,
                expiration=expiration_date,
                strike=short_call_strike,
                right=Asset.OptionRight.CALL
            )
    
            long_call = Asset(
                symbol=self.parameters["symbol"],
                asset_type=Asset.AssetType.OPTION,
                expiration=expiration_date,
                strike=long_call_strike,
                right=Asset.OptionRight.CALL
            )
    
            short_put = Asset(
                symbol=self.parameters["symbol"],
                asset_type=Asset.AssetType.OPTION,
                expiration=expiration_date,
                strike=short_put_strike,
                right=Asset.OptionRight.PUT
            )
    
            long_put = Asset(
                symbol=self.parameters["symbol"],
                asset_type=Asset.AssetType.OPTION,
                expiration=expiration_date,
                strike=long_put_strike,
                right=Asset.OptionRight.PUT
            )

    Step 5: Logging Option Prices

    For each of the option legs, the strategy logs the price using get_last_price() and adds it to a graph for tracking.

    # Log option details
            for option in [short_call, long_call, short_put, long_put]:
                option_price = self.get_last_price(option.symbol)
                self.log_message(f"Price of {option.symbol}: {option_price}")
                self.add_line(f"{option.symbol} Price", option_price)

    Step 6: Check for Existing Positions

    The strategy checks if the Iron Condor position has already been placed by looking at the current positions. If there are no significant positions (other than cash), the Iron Condor order is created and placed.

    # Check if Iron Condor is already placed
            current_positions = self.get_positions()
            if len(current_positions) <= 1:  # Only USD present
                quantity = self.parameters["quantity"]
    
                # Create orders for each leg
                orders = [
                    self.create_order(short_call.symbol, quantity, "sell"),
                    self.create_order(long_call.symbol, quantity, "buy"),
                    self.create_order(short_put.symbol, quantity, "sell"),
                    self.create_order(long_put.symbol, quantity, "buy")
                ]
    
                # Submit all orders
                for order in orders:
                    self.submit_order(order)

    Backtesting Your Strategy With Lumibot

    The following code snippet demonstrates how to run the IronCondorStrategy using the Alpaca broker with Lumibot. This setup allows traders to leverage the capabilities of Lumibot to automate their options trading strategies effectively.

    if __name__ == "__main__":
      
        from lumibot.brokers import Alpaca
        from lumibot.traders import Trader
    
        ALPACA_CONFIG = {
                "API_KEY": "",  # Add your Alpaca API Key here
                "API_SECRET": "",  # Add your Alpaca API Secret here
                "PAPER": True,  # Set to True for paper trading, False for live trading
            }
            
           
            # Set up the Alpaca broker and run the strategy
        broker = Alpaca(ALPACA_CONFIG)
        strategy = IronCondorStrategy(broker=broker)
        trader = Trader()
        trader.add_strategy(strategy)
        trader.run_all()

    Key Points in the Code

    • Broker Configuration: The ALPACA_CONFIG dictionary contains the necessary API credentials for the Alpaca brokerage account.

    API_KEY: Your unique API key provided by Alpaca, which authorizes your trading requests.

    API_SECRET: Your secret key associated with the API key, used for authentication.

    PAPER: This boolean flag indicates whether to use paper trading (simulated environment) or live trading. Setting this to True enables you to test your strategy without risking real capital.

    • Broker Initialization: An instance of the Alpaca broker is created using the configuration defined in ALPACA_CONFIG. This broker instance will handle the trading operations on the Alpaca platform.
    • Strategy Setup: The IronCondorStrategy is instantiated with the broker instance passed as an argument. This links the strategy to the broker, enabling it to place trades based on the Iron Condor parameters defined earlier in the code.
    • Trader Instance: A Trader instance is created. The Trader class is responsible for managing the execution of strategies. By adding the IronCondorStrategy to the trader, it becomes part of the automated trading system.

    Complete Code

    from lumibot.strategies.strategy import Strategy
    from lumibot.entities import Asset
    
    class IronCondorStrategy(Strategy):
        parameters = {
            "symbol": "SPY",  # Underlying stock symbol
            "quantity": 1               # Number of contracts for each leg
        }
    
        def initialize(self):
            self.sleeptime = "1D"  # Adjust as needed
    
        def on_trading_iteration(self):
            """Places an Iron Condor once and manages the position"""
    
            # Get current time and default expiration date to today
            current_time = self.get_datetime().date()
            self.log_message(f"Current datetime: {current_time}")
            
            # Set expiration date to today
            expiration_date = current_time
    
            # Fetch the current price of the underlying asset
            underlying_asset = Asset(
                symbol=self.parameters["symbol"],
                asset_type=Asset.AssetType.STOCK
            )
            underlying_price = self.get_last_price(underlying_asset.symbol)
    
            # Automatically determine the strike prices
            short_call_strike = round(underlying_price * 1.05, 2)  # Short call strike 5% above current price
            long_call_strike = round(underlying_price * 1.10, 2)   # Long call strike 10% above current price
            short_put_strike = round(underlying_price * 0.95, 2)   # Short put strike 5% below current price
            long_put_strike = round(underlying_price * 0.90, 2)    # Long put strike 10% below current price
    
            # Define the four legs of the Iron Condor
            short_call = Asset(
                symbol=self.parameters["symbol"],
                asset_type=Asset.AssetType.OPTION,
                expiration=expiration_date,
                strike=short_call_strike,
                right=Asset.OptionRight.CALL
            )
    
            long_call = Asset(
                symbol=self.parameters["symbol"],
                asset_type=Asset.AssetType.OPTION,
                expiration=expiration_date,
                strike=long_call_strike,
                right=Asset.OptionRight.CALL
            )
    
            short_put = Asset(
                symbol=self.parameters["symbol"],
                asset_type=Asset.AssetType.OPTION,
                expiration=expiration_date,
                strike=short_put_strike,
                right=Asset.OptionRight.PUT
            )
    
            long_put = Asset(
                symbol=self.parameters["symbol"],
                asset_type=Asset.AssetType.OPTION,
                expiration=expiration_date,
                strike=long_put_strike,
                right=Asset.OptionRight.PUT
            )
    
            # Log option details
            for option in [short_call, long_call, short_put, long_put]:
                option_price = self.get_last_price(option.symbol)
                self.log_message(f"Price of {option.symbol}: {option_price}")
                self.add_line(f"{option.symbol} Price", option_price)
    
            # Check if Iron Condor is already placed
            current_positions = self.get_positions()
            if len(current_positions) <= 1:  # Only USD present
                quantity = self.parameters["quantity"]
    
                # Create orders for each leg
                orders = [
                    self.create_order(short_call.symbol, quantity, "sell"),
                    self.create_order(long_call.symbol, quantity, "buy"),
                    self.create_order(short_put.symbol, quantity, "sell"),
                    self.create_order(long_put.symbol, quantity, "buy")
                ]
    
                # Submit all orders
                for order in orders:
                    self.submit_order(order)
    
    if __name__ == "__main__":
        from lumibot.brokers import Alpaca
        from lumibot.traders import Trader
    
        ALPACA_CONFIG = {
            "API_KEY": "",  # Add your Alpaca API Key here
            "API_SECRET": "",  # Add your Alpaca API Secret here
            "PAPER": True,  # Set to True for paper trading, False for live trading
        }
            
        # Set up the Alpaca broker and run the strategy
        broker = Alpaca(ALPACA_CONFIG)
        strategy = IronCondorStrategy(broker=broker)
        trader = Trader()
        trader.add_strategy(strategy)
        trader.run_all()

    Output

    Conclusion

    While its complexity may intimidate some traders, platforms like Lumibot simplify the process by automating trade execution and management. With Lumibot, you can easily set up, backtest, and execute Iron Condor trades without needing to monitor the market constantly. Its integration with multiple brokers and robust customization options make it a valuable tool for both novice and experienced traders. 

    Overall, using Lumibot to automate the Iron Condor strategy allows you to make smarter, more efficient trading decisions while managing your risk effectively. So, whether you’re looking to add a new options strategy to your toolkit or automate your existing trades, Lumibot can help you trade the Iron Condor with greater ease and precision.

    Categories
    Uncategorized

    Integrating Lumibot with Tradier: A Practical Guide

    Introduction

    In the fast-paced world of financial markets, automation is becoming essential for traders seeking to optimize their strategies, minimize risk, and capitalize on market opportunities 24/7. The rise of algorithmic trading has ushered in a new era, allowing traders to harness powerful tools and technologies to build sophisticated trading systems. Two key players enabling this transformation are Lumibot and Tradier, each offering unique capabilities that, when combined, create a robust platform for automated trading.

    Lumibot provides a flexible, Python-based framework designed for building custom algorithmic trading bots, enabling you to program, test, and deploy complex strategies with ease. On the other hand, Tradier is a versatile brokerage service that not only offers access to an array of trading instruments but also provides a cutting-edge API for seamless trade execution.

    In this guide, we’ll take you step-by-step through the process of connecting these platforms, ensuring you can effortlessly automate your trading strategies and stay ahead in today’s competitive market.

    Why Integrating Lumibot With Tradier Enhances Trading Strategies?

    Integrating Lumibot with Tradier takes your trading to the next level by seamlessly combining the strengths of both platforms. Lumibot provides a powerful, customizable framework for building sophisticated algorithmic trading strategies using Python. This flexibility allows traders to implement complex rules and data-driven approaches tailored to their specific needs. Meanwhile, Tradier’s brokerage API offers fast, reliable, and scalable execution capabilities, enabling real-time market access and order fulfillment.

    Together, this integration empowers you to fully automate your trading strategies, ensuring trades are executed according to precise rules without manual intervention. This minimizes human error, reduces emotional decision-making, and optimizes the efficiency of trading operations. Additionally, the ability to run backtests and fine-tune strategies using historical data before deploying them live gives you a reliable environment to refine your approach, ultimately improving trading performance and consistency.

    The Powerful Advantages of Integrating Lumibot with Tradier

    Let’s explore the compelling advantages of integrating Lumibot with Tradier and how this combination can significantly elevate your trading strategies.

    Cost-Efficiency

    Tradier stands out for its cost-effective pricing structure, offering competitive commissions and flexible monthly subscription models tailored to different types of traders. Whether you’re a retail trader managing a personal portfolio or a professional running larger accounts, Tradier provides an affordable solution that can scale according to your trading needs.

    Comprehensive API

    Tradier’s robust API offers a wide array of functionalities essential for successful algorithmic trading. From retrieving real-time and historical market data to managing trade orders, positions, and accounts, Tradier provides an all-encompassing solution. This API integrates seamlessly with Lumibot, enabling the execution of even the most complex algorithmic strategies. With this integration, traders can build, test, and deploy strategies without needing to worry about the technical complexity. 

    Flexibility

    Lumibot offers traders unparalleled flexibility by leveraging Python, one of the most widely-used programming languages in the financial world. Python’s extensive libraries and simple syntax allow traders to customize strategies to their unique needs. When paired with Tradier’s execution engine, traders can design, iterate, and deploy their Python-based strategies directly in the live markets, making the integration highly versatile and accessible. 

    Scalability

    Both Lumibot and Tradier are built with scalability in mind. Tradier’s infrastructure is designed to handle a high volume of trading requests and orders, ensuring that as your strategies evolve and grow, the platform can keep up with the demand without any degradation in performance. Similarly, Lumibot allows you to run multiple strategies simultaneously, monitor different markets, and make split-second trading decisions. 

    Security

    Security is a top priority for both Lumibot and Tradier. Tradier implements industry-standard secure protocols, including encryption, to safeguard sensitive information such as your account data and transaction details. At the same time, Lumibot ensures that all communication between your trading bots and the broker is encrypted and secure. This high level of security ensures that your trading operations remain confidential and protected from any unauthorized access. 

    Step-by-step Guide For Integrating Lumibot With Tradier

    Here’s a step-by-step guide to walk you through the entire integration process, from setting up your accounts to implementing your first trading strategy. 

    Step 1: Importing Libraries and Dependencies

    The first step is importing necessary libraries and modules that provide the foundation for the strategy. The datetime module is imported to handle date and time-related operations. Next, Strategy is imported from lumibot.strategies.strategy, which allows you to create a custom trading strategy based on Lumibot’s framework. Additionally, the Asset class is imported, which will be used to define and manage option-related assets, such as strike prices and expiration dates. 

    from datetime import datetime
    from lumibot.strategies.strategy import Strategy
    from lumibot.entities import Asset  # Assuming Asset is imported from lumibot

    Step 2: Defining the “BuyAndHoldOption” Strategy Class

    This step defines the BuyAndHoldOption strategy class, which extends Lumibot’s base Strategy class. The parameters dictionary is used to configure key aspects of the options trade, such as the underlying stock symbol (SPY), the expiration date of the option, the strike price, and whether the option is a call or a put. 

    class BuyAndHoldOption(Strategy):
        parameters = {
            "symbol": "SPY",  # Underlying stock symbol
            "expiration_date": "2024-01-19",  # Option expiration date
            "strike_price": 150,  # Strike price
            "option_type": "call",  # "call" or "put"
        }

    Step 3: Initializing the Strategy

    The initialize method is called once at the start of the strategy execution. Here, the sleeptime is set to “1M”, which indicates that the strategy will check and perform its operations every minute. This step sets the timing and frequency of the trading bot’s iteration loop, ensuring the strategy continuously monitors the market conditions and the option’s price in real time. The on_trading_iteration method contains the core logic of the strategy and runs every minute as set by the sleeptime.

    def initialize(self):
            self.sleeptime = "1M"
    
        def on_trading_iteration(self):
            """Buys the specified option once, then holds it"""

    Step 4: Logging the Current Time and Creating the Option Asset

    The first action it performs is to log the current time using self.get_datetime() for debugging and transparency purposes. It then creates an option_asset object, defining the option to be traded using the parameters such as the underlying symbol (SPY), expiration date, strike price, and the type of option (call or put). 

    current_time = self.get_datetime()
            self.log_message(f"Current datetime: {current_time}")
    
            # Create option object
            option_asset = Asset(
                symbol=self.parameters["symbol"],
                asset_type=Asset.AssetType.OPTION,
                expiration=self.parameters["expiration_date"],
                strike=self.parameters["strike_price"],
                right=Asset.OptionRight.CALL if self.parameters["option_type"] == "call" else Asset.OptionRight.PUT
            )

    Step 5: Fetching the Option Price and Logging It

    Once the option asset is created, the next step is to fetch its latest market price using self.get_last_price(option_asset.symbol). This method retrieves the most recent price of the option and logs it for tracking. Logging the price is crucial for keeping a record of the market data at the time of execution. The strategy also adds the option price to a chart using self.add_line(), providing a visual representation of price movement, which can be useful for reviewing the performance of the trade.

    option_price = self.get_last_price(option_asset.symbol)
            self.log_message(f"The price of option {option_asset.symbol} is {option_price}")
    
            self.add_line(f"{option_asset.symbol} Price", option_price)


                quantity_to_buy = 1
    
                buy_order = self.create_order(option_asset.symbol, quantity_to_buy, "buy")
                self.submit_order(buy_order)

    Backtesting Integrating Lumibot With Tradier

    One of the standout features of integrating Lumibot with Tradier is the capability to backtest your trading strategies, allowing you to assess their effectiveness using historical market data before committing real capital.

    if __name__ == "__main__":
    
      TRADIER_CONFIG = {
          'ACCESS_TOKEN': "",
          'ACCOUNT_NUMBER': "",
          "PAPER": True,  # Change to True if using paper trading
      }
      
      from lumibot.brokers import Tradier
      from lumibot.traders import Trader
      
      broker = Tradier(TRADIER_CONFIG)
      
      strategy = BuyAndHoldOption(broker=broker)
      
      trader = Trader()
      trader.add_strategy(strategy)
      trader.run_all()

    Key Points in the Code

    • IS_BACKTESTING Flag: Thisvariable determines the operational mode of the script. When set to True, the script will execute in backtesting mode, utilizing historical data to simulate trades. Conversely, when set to False, the script will engage in live trading, directly interacting with the Tradier brokerage for executing actual trades.
    • Backtest Period: The backtesting phase is set to analyze the performance of the trading strategy from January 1, 2024, to September 1, 2024. This time frame allows traders to assess how the strategy would have reacted to market movements during this period, providing a comprehensive evaluation of its viability.
    • Polygon Data Backtesting: When backtesting is enabled, the code imports the PolygonDataBacktesting class, which facilitates the simulation of trades based on historical market data. This class is instrumental in generating realistic trading scenarios for testing strategies.

    Broker Configuration: In live trading mode, the TRADIER_CONFIG dictionary holds essential information, including the access token, account number, and a flag indicating whether the trading is paper (simulated) or real. This configuration is crucial for establishing a secure connection with the Tradier API

    Complete Code

    from datetime import datetime
    from lumibot.strategies.strategy import Strategy
    from lumibot.entities import Asset  # Assuming Asset is imported from lumibot
    
    
    class BuyAndHoldOption(Strategy):
        parameters = {
            "symbol": "AAPL",  # Underlying stock symbol
            "expiration_date": "2024-12-20",  # Option expiration date
            "strike_price": 150,  # Strike price
            "option_type": "call",  # "call" or "put"
        }
    
        def initialize(self):
            self.sleeptime = "1M"
    
        def on_trading_iteration(self):
            """Buys the specified option once, then holds it"""
    
            current_time = self.get_datetime()
            self.log_message(f"Current datetime: {current_time}")
    
            # Create option object
            option_asset = Asset(
                symbol=self.parameters["symbol"],
                asset_type=Asset.AssetType.OPTION,
                expiration=self.parameters["expiration_date"],
                strike=self.parameters["strike_price"],
                right=Asset.OptionRight.CALL if self.parameters["option_type"] == "call" else Asset.OptionRight.PUT
            )
    
            option_price = self.get_last_price(option_asset.symbol)
            self.log_message(f"The price of option {option_asset.symbol} is {option_price}")
    
            self.add_line(f"{option_asset.symbol} Price", option_price)
    
            quantity_to_buy = 1 
    
    
            buy_order = self.create_order(option_asset.symbol, quantity_to_buy, "buy")
            self.submit_order(buy_order)
            print(buy_order)
    
    
    if __name__ == "__main__":
        
      TRADIER_CONFIG = {
          'ACCESS_TOKEN': "",
          'ACCOUNT_NUMBER': "",
          "PAPER": True,  # Change to True if using paper trading
      }
    
      from lumibot.brokers import Tradier
      from lumibot.traders import Trader
    
      broker = Tradier(TRADIER_CONFIG)
    
      strategy = BuyAndHoldOption(broker=broker)
    
      trader = Trader()
      trader.add_strategy(strategy)
      trader.run_all()

    Order is Placed

    Integrating Lumibot with Tradier presents a powerful opportunity for traders seeking to enhance their trading strategies through automation and efficiency. By leveraging Lumibot’s flexible algorithmic trading framework alongside Tradier’s brokerage services, you can build, test, and deploy customized trading strategies tailored to your unique goals. Whether you are a novice looking to automate your trades or a seasoned professional aiming to optimize your strategies, this integration equips you with the tools necessary to navigate today’s fast-paced financial markets successfully.

    Categories
    Algorithmic Trading Uncategorized

    How to Get an Asset’s Historical Prices Using Lumibot 

    Introduction

    Whether it is the daily historical data, tick level data, or the order book data, all these are the historical pricing details of an Asset for a specified period and used in the trading bot to craft simplest to most complex strategies, fundamental analysis, long term trend analysis and fulfilling loads of other requirements. When used in a trading bot, historical price data allows traders to plan their strategies based on the historical performance of that particular asset. In addition to Historical price data being handy for investment analysis, it is also beneficial when it comes to risk assessment and valuation. Hence, traders can do wonders in their trading bot using historical prices. 

    Historical data on securities can serve as a record source of information for investors, analysts, and traders, which they can use to develop a more successful trading bot. The knowledge of the past performance of securities while creating the trading bot can help trading programmers gain valuable insights into market trends, and it can also help them make informed investment decisions through their trading bot strategies. Lumibot is a Python trading library that lets us quickly grab the asset’s historical prices, which can be further used to code highly effective strategy. 

    Read on to find out how historical Price Data can be used and how it can be easily fetched from possible sources using Lumibot. 

    Why You Should Use Historical Data in Your Trading Bot

    Historical prices are financial data saved at various intervals, whether days, minutes, or annually. Different historical data types are daily, tick-level, and order-type data. While daily data is suitable for low-frequency trading strategies, the tick-level data is good for high-frequency trading strategies. The importance of using historical data in a trading bot can be understood by realizing that adding historical data to a trading bot can help you make predictions based on past occurrences. Such data can be used in various cases, including below. 

    Investment Analysis

    The knowledge of past data can not only help us understand future trends but can also help us make informed decisions. Such information is what traders use manually to earn profit in trading, and the same information can be used to program a proper strategy, which is essential when making the trading bot.

    1. Valuation

    The valuation of securities is crucial while creating a trading bot strategy, and it’s easier to make a trading bot with such information. With the help of historical prices, it is possible to calculate the intrinsic value and compare it with the market price. Intrinsic value, when compared to the stock’s current market value, helps to determine whether the stock is a good buy or a good sale. The stock is supposed to be a good buy when the current market price of that stock is less than its intrinsic value.

    1. Risk Assessment 

    Historical volatility is a statistical evaluation of the distribution of returns for a given financial instrument (security) or market index over a given period. In general, this measure is calculated by calculating the average deviation compared to a security’s average price over a given period. The more volatility there is, the riskier the asset is for trading. Historical volatility is calculated using the asset’s historical price data. This information plays a very crucial role in creating a trading bot strategy, as no strategy is complete without proper risk management.

    1. Machine Learning and Sentiment Analysis

    Some bots employ machine learning algorithms to adapt and learn from market data, such as historical price data, and improve their trading strategies. While news plays an essential role in sentiment analysis as well as social media information, historical price data cannot be discarded when it comes to algorithmic trading. Bots could react to historical price data, much like news and social media trends, in real time.

    Steps To Use get_historical_price() Method in Lumibot

    Prerequisites

    Must have Python installed in the system(version 3.10 or above)Install required Python packages.

    pip install lumibot
    

    Necessary imports for running the Python file.

    from lumibot.strategies import Strategy

    Create ALPACA_CONFIG with API KEY and API SECRET by logging in or signing up at https://alpaca.markets/

    Steps for Using get_historical_price()

    Step 1: Add ALPACA_CONFIG Details

    Alpaca is a broker, just like the interactive broker. The details below are required to use the Alpaca broker API.

    ALPACA_CONFIG = {
        "API_KEY": "YOUR_API_KEY_HERE", # Get your API Key from
    https://alpaca.markets/
        "API_SECRET": "YOUR_SECRET_HERE", # Get your secret from
    https://alpaca.markets/
        "PAPER":True # Set to False for real money
    }

    Step 2: Create a GetHistoricalPrice Class 

    Once you have added the Alpaca config detail, create a GetHistoricalPrice class, which will inherit the Strategy class as below.

    class GetHistoricalPrice(Strategy):

    Step 3: Add  on_trading_iteration() Method 


    Once you have added the initialize method, follow with the creation of  on_trading_iteration() method as below:

     def on_trading_iteration(self):
            """Get the historical price for an asset"""
    
    
            bars = self.get_historical_prices("AAPL", 10, "day")
            df = bars.df
    
            print(df)
    
            last_ohlc = df.iloc[-1]
    
    
            self.log_message(f"The last closing price of AAPL: {last_ohlc['close']}")
            # Calculate the maximum closing price over the last ten days
    
            max_close = df['close'].max()
            self.log_message(f"Maximum closing price of AAPL over the last 10 days: {max_close}")
    
            # Check if the last closing price is the highest
    

    The above code snippet creates the on_trading_iteration() method, which chiefly fetches the asset’s historical price. Details of each term used are below:

    Bars: This refers to the price bar or candlestick, which is a graphical representation of the price movement over a specific period of time. There is an open price, high price, low price, and close price, which are self-understood from the terms. For example, a high price means the highest price reached during the period. However, the bars here are variable and have been named as such. For example, the output from the get_historical_price() will have data ranging from open price to dividend and volume. 

    bars.df: This is the panda data frame of the historical price data of the specified asset.

    Note: The bars  variable is assigned its value through:

    bars =  self.get_historical_prices("AAPL", 10, "day")
    

    The data stored in bars is, hence, like open price, close price, etc., as mentioned above. Some others can be volume and dividend.

    Iloc[-1]: This integer-location-based indexing method allows users to access data in specific positions in the data frame. It is strictly integer-based, starting from 0 to the length-1 of the axis, and is used for retrieving rows and columns by integer positions.

    The above will assign the values from the last row of the PDF to the last_ohlc variable. This variable will store the OHLC (Open, High, Low, Close) data for the last period. The data in the last_ohlc variable can then be applied for further analysis to calculate the most recent OHLC values. Above, we are extracting the last closing price from the data frame and checking whether it is the maximum.

    Note 1: Running the Code in the Same File 

    In Python, if __name__ == “__main__”: is a conditional statement, which allows you to control the execution of code depending on whether the script is run directly or imported as a module. This implies that the code will run only if runs as a script and not as a module. 

    if __name__ == "__main__": 

    Step 4: Import Alpaca and Trader 

    Import Alpaca and Trader classes from Lumibot.brokers and Lumibot.traders modules. While Alpaca is an interface to the Alpaca trading platform, it leverages us with the functionalities to interact with the Alpaca API for implementing things like placing orders, managing positions, and fetching market data like Historical Price Data, which we are doing in this blog.

    The Trader class helps orchestrate the trading process, managing multiple trading strategies, interacting with brokers like Alpaca, Interactive Brokers, and Tradiers, handling order execution and position management, and ensuring a framework for live trading and backtesting. 

    from lumibot.brokers import Alpaca
    from lumibot.traders import Trader
    

    Step 5: Create Trader Class Object

    As you import the Alpaca and Trader class, create the trader object of the Trader() class.

    trader = Trader()
    

    Step 6: Create an Object of Alpaca Class

    On creation of the trader class object, create the object of the Alpaca class by passing the Alpaca_Config array created above.

    broker = Alpaca(ALPACA_CONFIG)
    

    Step 7: Create an Object of GetHistoricalPrice Class

    Once we have created the object for the Alpaca class, we will create an object of the GetHistoricalPrice class by passing the Alpaca object (broker) as a parameter to the GetHistoricalPrice class. 

    strategy = GetHistoricalPrice(broker=broker)
    

    Step 8: Pass the Strategy to the Trader Class Object

    On creation of the object of the GetHistoricalPrice class, add the strategy to the trader class object using the add_strategy() method.

    trader.add_strategy(strategy)
    

    Step 9: Start the Overall Trading Process

    The code below starts the overall trading process. This typically executes backtesting or a live trading process for a collection of strategies within a trading platform. This command starts the execution engine. It establishes the connection with a broker, which is Alpaca, and starts background tasks like market data ingestion and order management. Briefly, it is the starting point of the trading process.

    trader.run_all()
    

    Complete Code

    Below is the entire code. Simply paste the code below in a gethistprice.py file, add the Alpaca API and secret keys, install the prerequisites, and run the code. However, ensure the market is open, which applies to US markets. The pre-trading hours start at 4 a.m. and end at 9:30 a.m. The regular trading hours begin at 9:30 a.m. and end at 4 p.m., and the after-trading hours last from 4 p.m. to 8 p.m. All timings are in Eastern Time (ET). Run the below code during regular trading hours.

    from lumibot.strategies import Strategy
    
    ALPACA_CONFIG = {
        "API_KEY": "",
        "API_SECRET": "",
        "PAPER": True,
    }
    
    class GetHistoricalPrice(Strategy):
    
        def on_trading_iteration(self):
            """Get the historical price for an asset"""
    
    
            bars = self.get_historical_prices("AAPL", 10, "day")
            df = bars.df
    
            print(df)
    
            last_ohlc = df.iloc[-1]
    
    
            self.log_message(f"The last closing price of AAPL: {last_ohlc['close']}")
            # Calculate the maximum closing price over the last 10 days
    
            max_close = df['close'].max()
            self.log_message(f"Maximum closing price of AAPL over the last 10 days: {max_close}")
    
            # Check if the last closing price is the highest
    
    
    if __name__ == "__main__":
        from lumibot.brokers import Alpaca
        from lumibot.traders import Trader
    
        trader = Trader()
        broker = Alpaca(ALPACA_CONFIG)
        strategy = GetHistoricalPrice(broker=broker)
        trader.add_strategy(strategy)
        trader.run_all()


    Output

    Conclusion

    Not only can historical price data help traders discover trading opportunities, risk management, and portfolio development, but it also helps evaluate strategies through backtesting. Nowadays, with new technologies like machine learning and sentiment analysis, the historical price data, whether daily, intra-day, tick level, or order type, have become even more powerful weapons for traders as they can predict future trends and compete better with their competitors. New storage technologies from cloud service providers have made the heavy storage requirements quite cheaper. However, having this historical data in-house is not always possible, and the attributes vary for different assets. Thanks to third-party data sources, which now provide highly accurate historical data in real-time. Are you looking to use the asset’s historical price in your Python trading bot using Lumibot to backtest and optimize your trading strategy? Developed by expert developers and financial experts at Lumiwealth, Lumibot is a trading framework that can effortlessly help you add an asset’s historical price to even the most complex trading strategies. Visit our site now to register for a training course where our expert programmers with ample knowledge in trading will teach you the nitty-gritty of algorithmic trading programming in Python using Lumibot.


    Categories
    Uncategorized

    How to Get An Asset’s Last Price Using Lumibot

    Introduction

    Let’s face it, navigating the dynamic world of financial markets demands a well-defined approach, and it’s here where an asset’s last trading price plays a vital role. Whether you are developing a trading bot for options trading or futures trading, adding the asset’s last price is essential as the bot must consider the price movement each second and work dynamically on the strategy it is built upon. Unlike the closing price, which is the final price at the end of the trading session, the asset’s last price fluctuates as trades occur. It shows the current price of a lump sum transaction where a buyer and seller agree to some terms while trading any security or asset. It offers investors a method to gauge the most recent trading value of a security, offering an alternative for those aiming to make quick gains without engaging in continuous trading.

    By adding the asset’s last price to your trading bot, you can not only fetch it in real-time till required but can also automate the code execution and use the refreshed value in your strategy. Built using Python, Lumibot allows you to get the asset’s last price in your trading strategies t. Whether it is to fetch an asset’s last price or a set of asset’s last prices, Lumibot lets users fetch through a few simple lines of code in Python.  

    Let’s find out how you can get an asset’s last price using Lumibot’s last price method.

    But before getting into the nitty-gritty, let’s find out why you need an asset’s last price in your trading bot.

    Why You Need Asset’s Last Price in Your Trading Bot

    Whether you want to implement real-time decision-making functionality in your trading bot or calculate the profit target, adding the Asset’s last price to your trading bot is essential. By adding the asset’s last price to your trading bot, you can not only do a proper risk assessment, but you can also create more profitable strategies. 

    Read on to find out why you need to add Asset’s Last Price to your trading bot.

    • Real-time Decision-making

    It goes without saying that real-time data can be essential for traders who have to make informed decisions every hour, especially for traders who want to implement a real-time decision-making feature in their bot. While implementing different strategies in a trading bot, the first and foremost requirement is the asset’s last price. The value also requires updating each second. Many Python trading bot frameworks like Lumibot come with the asset_last_price() method, which, on implementation, updates the asset’s last price variable each hour with the most recent value.

    • Market Sentiment

    In addition to helping you make real-time decisions, adding the asset’s last price to your trading bot can also help you determine the shifts in market sentiment. Furthermore, sudden increases or decreases convey investor perceptions, which impact buying or selling decisions. On this basis, traders can program trading bots to make buying or selling decisions on their own. 

    • Analyzing Price Movements

    No matter what trading strategy the traders are looking to make, observing the LTP over a period in the trading bot from an investor perspective is essential as it helps analyze price movements and identify trends in the stock’s performance. Knowing an asset’s last price is a must for technical analysis, where traders study historical price data to predict future price movements.

    • Execution of Market Orders

    The trading bots can be triggered to execute the market order using the asset’s last price. While the market order conveys a clear-cut message to buy or sell the asset immediately at the best available price, the asset’s last price helps the traders figure out the market condition. The market order is generally filled at a price different from the last traded price, but the asset’s last price ideally helps in deciding when to execute the market order.

    Steps to Use the get_last_price() Method in Lumibot

    Prerequisites

    Before adding the main code, you need to ensure the following prerequisites:

    Must have Python installed in the system(version 3.10 or above)

    Setting Up Lumibot

    1. Ensure you have Python installed on your PC. 

    Note 1: Users can download the most recent stable version of Python from here.

    Note 2: For the screenshots below, we used Pycharm as an IDE.


    Check the Python version using the command: python –version

    python -version

    2. Once you have downloaded and installed Python, install Lumibot using pip: pip install Lumibot from the terminal.

    pip install lumibot

    3. After you have installed the Lumibot, import the classes below to run the Python file.

    
    import lumibot
    from lumibot.strategies import Strategy
    from lumibot.entities import Asset
    from lumibot.traders import Trader
    from datetime import datetime


    4. Finally, create ALPACA_CONFIG with API KEY and API SECRET by logging in or signing up at https://alpaca.markets/.

    Steps for Using get_last_price()

    Step 1: Add ALPACA_CONFIG Details

    To get an asset’s last price using Lumibot, you need to configure a broker.

    Note: For this blog, ALPACA has been used as a broker.

    To use ALPACA broker API, add the API Key and API secret key as below:

    ALPACA_CONFIG = {
        "API_KEY": "YOUR_API_KEY_HERE", # Get your API Key from
    https://alpaca.markets/
        "API_SECRET": "YOUR_SECRET_HERE", # Get your secret from
    https://alpaca.markets/
        "PAPER":True # Set to False for real money
    }
    

    Step 2: Create a GetLastPrice Class 

    Once you have added ALPACA_CONFIG details, you need to create a GetLastPrice class, which will inherit the Strategy class below.

    class GetLastPrice(Strategy):

    Step 3: Add Class Parameters

    After you have created the GetLastPrice() class, add the class parameters like last_price_symbol and expiry.

    parameters = {
            "last_price_symbol": "AAPL",  # The symbol of the asset to get the last Price
            "expiry": datetime(2024, 11, 20),  # The expiry date 
        }


    Step 4: Add Initialize Method 

    Add an initializing method and set the sleep time as per your preference

      def initialize(self):
            self.sleeptime = "1m" 

    Step 5: Add  on_trading_iteration() Method 

    Once you have initialized the initialize() method, create the on_trading_iteration() method as below:

    • Create the last_price_symbol variable and assign it the value of last_price_symbol, which is the parameter of the GetLastPrice class in self.parameters. 
    • Create an object of Asset class and set its symbol as last_price_symbol and asset type as stock.
    • The GetLastPrice is the Strategy class, which contains the get_last_price(symbol) method. Call the method using self and pass last_price_symbol as a method parameter. 
    • Finally, using log_message, print the fetched last price for the stock used.
    def on_trading_iteration(self):
            """get the last price for an asset"""
            last_price_symbol = self.parameters['last_price_symbol']
    
            if self.first_iteration:
                asset = Asset(
                    symbol=last_price_symbol,
                    asset_type='stock',
                )
                last_price = self.get_last_price(last_price_symbol)
                self.log_message(f'Last Price {last_price} for {last_price_symbol}')
    

    Note 1: Running the Code in the Same File
    In Python, if name == “main“: is a conditional statement with which you can control the execution of code based on whether the script should be run directly or you require importing as a module. We can run the code from the same file with the help of the code mentioned below.

    if __name__ == "__main__": 

    Step 6: Import Alpaca and Trader 

    Once you have created the class and methods as above, import Alpaca and Trader classes into the main method, as below

    from lumibot.brokers import Alpaca
    from lumibot.traders import Trader

    Step 7: Create Trader Class Object

    After you have imported Alpaca and trader, create an object of the Trader Class.

     trader = Trader()

    Step 8: Create an Object of Alpaca Class

    Created the object of the Alpaca class by passing the Alpaca_Config list created previously.

    broker = Alpaca(ALPACA_CONFIG)
    

    Step 9: Create an Object of GetLastPrice Class

    Once you have created the object for the Alpaca class, you need to create an object of the GetLastPrice class by passing the alpaca object (broker) as a parameter to the GetLastPrice class.

     strategy = GetLastPrice(broker = broker)


    Step 10: Pass the Strategy to Trader Class Object

    Using the add_strategy method (), pass the strategy as a parameter, and add the strategy to the object of the Trader() class.

    trader.add_strategy(strategy)
    

    Step 11: Execute Strategy for Getting the Last Price of the Asset

    Finally, to execute the get_last_prices() method, run the run_all method of the trader class using the trader object

    trader.run_all()
    

    Complete Program Code

    import lumibot
    from lumibot.strategies import Strategy
    from lumibot.entities import Asset
    from lumibot.traders import Trader
    from datetime import datetime
    
    ALPACA_CONFIG = {
        "API_KEY": "",
        "API_SECRET": "",
        "PAPER":True
    }
    
    class GetLastPrice(Strategy):
        parameters = {
            "last_price_symbol":"AAPL",  # The symbol of the asset to get the last Price
            "expiry": datetime(2024, 11, 20),  # The expiry date 
        }
    
        def initialize(self):
            self.sleeptime = "1m"  
    
        def on_trading_iteration(self):
            """get the last price for an asset"""
            last_price_symbol = self.parameters['last_price_symbol']
    
            if self.first_iteration:
                asset = Asset(
                    symbol=last_price_symbol,
                    asset_type='stock',
                )
            last_price = self.get_last_price(last_price_symbol)
            self.log_message(f'Last Price {last_price} for {last_price_symbol}')


    if __name__ == "__main__":
    
            from lumibot.brokers import Alpaca
            from lumibot.traders import Trader
    
            trader = Trader()
            broker = Alpaca(ALPACA_CONFIG)
            strategy = GetLastPrice(broker = broker)
            trader.add_strategy(strategy)
            trader.run_all()
    

    Output

    Conclusion

    With the rapid evolution in technology and the improving accessibility of the financial markets, it has become more important than ever to have an in-depth understanding of the last traded price and its impact on trading decisions. Whether you are building a trading bot for options trading or futures, adding the asset’s last price is important as the bot must look into the price movement each second and operate dynamically on the strategy it is built upon. Are you looking to add an asset’s last price to your trading bot using Lumibot? Developed by expert developers and financial experts at Lumiwealth Lumibot is a trading framework that can help you easily add asset’s last price in even the most complex trading strategies effortlessly. Visit our site now to register for a training course where our expert programmers with ample knowledge in trading will teach you the nitty-gritty of algorithmic trading programming in Python using Lumibot. 

    Categories
    Uncategorized

    Navigating the AI Revolution: ChatGPT, Algorithmic Trading, and the Looming Job Crisis for Brokers and Traders

    ChatGPT and AI's impact on trading and broker jobs

    Introduction to the AI revolution in trading and investing

    Artificial Intelligence (AI) Like ChatGPT  is revolutionizing almost every industry, and the trading and investing sector is no exception. From algorithmic trading systems that analyze vast amounts of data to predictive models that forecast market trends, AI technologies are transforming the way people invest and trade. The rapid advancements in AI and machine learning have significant implications for brokers and traders, with some experts predicting a looming job crisis in the industry.

    The financial sector has always been a frontrunner in adopting cutting-edge technologies, and AI is no exception. In this article, we will explore the impact of AI on trading and investing, with a particular focus on ChatGPT, algorithmic trading, and the potential job crisis for brokers and traders. We will also discuss how industry professionals can adapt to the AI-driven landscape and the future prospects of AI in trading.

    Understanding ChatGPT and its applications in finance

    ChatGPT is a state-of-the-art language model developed by OpenAI. It is based on the GPT (Generative Pre-trained Transformer) architecture, which is designed to understand and generate human-like text based on the input it receives. ChatGPT has a wide range of applications, from customer service and virtual assistants to content creation and data analysis. In the financial sector, ChatGPT can be leveraged to enhance various aspects of trading and investing.

    For instance, ChatGPT can be used to analyze financial news, social media sentiment, and market data to generate insights and trading signals. It can also assist in creating personalized investment advice and generating financial reports. Additionally, ChatGPT can be integrated into customer service platforms to provide instant support and guidance to clients, improving the overall customer experience.

    Algorithmic trading: Definition and benefits

    Algorithmic trading, also known as algo trading or automated trading, is the use of computer algorithms to execute trades at high speed and with minimal human intervention. These algorithms are designed to analyze market data, identify trading opportunities, and execute orders based on pre-determined rules and strategies. Algo trading has grown in popularity due to its numerous benefits, including:

    1. Speed and efficiency: Algorithmic trading systems can process and analyze large volumes of data in real-time, allowing for faster decision-making and trade execution.
    2. Reduced human error: By automating the trading process, algo trading reduces the likelihood of errors caused by human emotions or fatigue.
    3. Cost savings: Automated trading systems can execute trades at the best available price, minimizing transaction costs and ensuring optimal execution.
    4. Diversification: Algo trading enables traders to invest in multiple markets and asset classes simultaneously, thereby spreading risk and enhancing portfolio performance.
    5. Customization: Traders can design and implement their own unique strategies based on their risk tolerance, investment objectives, and market insights.

    The growing popularity of algo trading in the financial industry

    The adoption of algorithmic trading has been growing steadily over the past few years, with more and more financial institutions and individual traders realizing its potential. According to a report by MarketsandMarkets, the global algorithmic trading market is expected to grow from $11.1 billion in 2019 to $18.8 billion by 2024, at a CAGR of 11.1% during the forecast period.

    This rapid growth can be attributed to several factors, including the increased availability of high-speed internet, advancements in computing power, and the growing sophistication of AI and machine learning algorithms. Furthermore, regulatory changes, such as the MiFID II (Markets in Financial Instruments Directive II) in Europe, have encouraged greater transparency and competition in the industry, providing a conducive environment for the growth of algo trading.

    Impact of AI and machine learning on traditional brokers and traders

    The rise of AI-driven technologies like ChatGPT and algorithmic trading has significant implications for traditional brokers and traders. As these advanced systems continue to gain traction, the demand for human expertise in trading and investing may decline, leading to a potential job crisis in the industry.

    The primary concern is that AI-powered systems can perform tasks more efficiently and accurately than human traders, making them increasingly redundant. For example, algorithmic trading systems can execute trades at lightning speed, analyze vast amounts of data, and adapt to changing market conditions in real-time. Similarly, ChatGPT can provide instant, personalized investment advice and generate comprehensive financial reports with minimal human input.

    As a result, job roles that once required significant human expertise and judgment, like stock brokers and traders, may be at risk of being displaced by AI-powered systems.

    Major players adopting AI in trading: JP Morgan and Morgan Stanley

    The growing adoption of AI in trading is evident from the investments made by major financial institutions like JP Morgan and Morgan Stanley. JP Morgan has been investing heavily in AI technologies, such as natural language processing, machine learning, and data analytics, to enhance its trading operations and improve client services. The bank has also partnered with AI startups to develop new trading algorithms and risk management tools.

    Similarly, Morgan Stanley has established an AI-driven trading unit called “AI Core” to develop and deploy machine learning models for trading and investment management. The bank is also working on AI-powered chatbots to provide personalized investment advice and improve customer service.

    These examples illustrate the growing importance of AI in the financial sector and the willingness of major players to adapt to the changing landscape.

    The looming job crisis for brokers and traders

    As AI technologies continue to reshape the trading and investing landscape, many traditional brokers and traders may find themselves facing a job crisis. According to a report by the World Economic Forum, nearly 1.3 million jobs in the global financial sector could be at risk due to AI and automation by 2026.

    To stay relevant in this rapidly changing environment, brokers and traders must adapt their skill sets and embrace the AI revolution. This may involve learning about AI technologies, understanding their applications in trading and investing, and developing new strategies that leverage the power of AI and machine learning.

    How brokers and traders can adapt to the AI-driven landscape

    For brokers and traders to remain competitive in the AI-driven landscape, they must focus on acquiring new skills and knowledge. Here are some suggestions to help them adapt:

    1. Learn about AI and machine learning: Understanding the fundamentals of AI, machine learning, and algorithmic trading is critical for staying relevant in the industry. Brokers and traders should invest time and resources in learning about these technologies and their applications in trading and investing.
    2. Embrace new technology: Rather than resisting AI-driven systems, brokers and traders should seek to incorporate them into their existing workflows. This could involve using AI-powered tools for data analysis, trade execution, or risk management.
    3. Develop new strategies: As AI continues to transform the trading and investing landscape, brokers and traders must devise innovative strategies that leverage the power of AI and machine learning. This could involve creating custom trading algorithms or developing new risk management techniques.
    4. Focus on value-added services: To differentiate themselves in the market, brokers and traders should concentrate on providing value-added services that AI-powered systems cannot replicate. This could include offering personalized investment advice, building strong client relationships, or providing expert market insights.

    Future prospects of AI and machine learning in trading and investing

    The future of AI and machine learning in trading and investing looks promising, with these technologies expected to drive significant innovation and efficiency gains in the industry. As AI algorithms become more sophisticated and capable, they will likely enable new trading strategies, improved risk management, and more accurate market predictions.

    Furthermore, the integration of AI with other emerging technologies, such as blockchain and the Internet of Things (IoT), could lead to the development of entirely new financial products and services. For instance, AI-driven smart contracts could facilitate automated, transparent, and secure transactions in the financial markets.

    Conclusion: Embracing the AI revolution for a sustainable trading career

    In conclusion, the AI revolution in trading and investing is well underway, with technologies like ChatGPT and algorithmic trading transforming the industry landscape. While these advancements pose challenges for traditional brokers and traders, they also present opportunities for those who are willing to adapt and embrace the new reality.

    By acquiring the necessary skills and knowledge, embracing new technologies, and focusing on value-added services, brokers and traders can ensure their long-term success in the AI-driven trading and investing landscape. The future of trading lies in the hands of those who are agile, forward-thinking, and ready to ride the wave of AI innovation.

    Categories
    Uncategorized

    Mastering Coin Price Prediction: Harnessing Machine Learning Algorithms for Smarter Crypto Trading

    Introduction to Coin Price Prediction

    In the world of cryptocurrency trading, predicting the future value of coins is of utmost importance. Traders and investors devote countless hours to studying market trends and analyzing historical data in order to make the most informed decisions possible. Coin price prediction is a complex process that requires a deep understanding of various factors affecting the market, such as supply and demand, market sentiment, and global economic trends.

    As the cryptocurrency market continues to expand and evolve, new tools and technologies have emerged to help traders make more accurate and timely predictions. Among these innovations, machine learning algorithms have shown great potential in revolutionizing the way we approach coin price prediction. By harnessing the power of artificial intelligence and advanced analytics, traders can gain valuable insights into market trends and make better-informed decisions for their investments.

    In this article, we will explore the significance of accurate coin price prediction, the role of machine learning algorithms in cryptocurrency trading, and how you can harness these powerful tools to improve your trading strategies. We will also discuss popular machine learning algorithms for coin price prediction, mastering bitcoin price USD prediction with machine learning, and top resources for learning machine learning cryptocurrency trading.

    The Significance of Accurate Coin Price Prediction

    Accurate coin price prediction is crucial for traders and investors for several reasons. First, it helps traders identify the best entry and exit points for their trades, maximizing their profits and minimizing potential losses. By making well-timed decisions based on accurate predictions, traders can capitalize on market opportunities and stay ahead of the competition.

    Second, accurate coin price prediction is essential for portfolio management. Portfolio managers need to constantly monitor and adjust their holdings to maintain a balanced and diversified portfolio. By accurately predicting the future value of various coins, they can make more informed decisions on which assets to buy, sell, or hold. This can significantly improve the performance of their portfolios and reduce their exposure to market risks.

    Finally, accurate coin price prediction can help foster greater confidence and trust in the cryptocurrency market. Uncertainty and volatility are inherent in the crypto market, and accurate predictions can help alleviate some of these concerns. When traders and investors have access to reliable and accurate price predictions, they are more likely to invest in cryptocurrencies and contribute to the growth of the market.

    Understanding Machine Learning Algorithms for Cryptocurrency Trading

    Machine learning is a subfield of artificial intelligence that involves the development of algorithms that can learn and improve from experience. In the context of cryptocurrency trading, machine learning algorithms can analyze vast amounts of historical and real-time data to identify patterns and make predictions about future price movements. These algorithms can be trained to recognize complex relationships between various factors affecting coin prices and generate more accurate predictions than traditional methods.

    The role of blockchain technology in crypto price prediction cannot be overstated. Blockchain technology provides a transparent, decentralized, and secure platform for storing and sharing transaction data. This wealth of data can be utilized by machine learning algorithms to analyze market trends and make more accurate price predictions. Additionally, the decentralized nature of blockchain technology can help reduce the risks associated with centralized data storage and manipulation.

    There are various machine learning techniques that can be applied to coin price prediction, such as supervised learning, unsupervised learning, and reinforcement learning. Supervised learning involves training an algorithm with labeled data, where the input data is paired with the correct output. In the case of coin price prediction, this may involve training an algorithm with historical price data and the corresponding future price movements. Unsupervised learning, on the other hand, involves training an algorithm with unlabeled data, allowing it to discover patterns and relationships within the data on its own. Reinforcement learning involves training an algorithm to make decisions based on the feedback it receives from its actions, allowing it to learn and optimize its decision-making process over time.

    Popular Machine Learning Algorithms for Coin Price Prediction

    There are several popular machine learning algorithms that can be applied to coin price prediction, each with its own strengths and weaknesses. Some of these algorithms include:

    1. Linear Regression: This is a simple algorithm that models the relationship between two variables by fitting a straight line to the observed data. In the context of coin price prediction, linear regression can be used to predict future prices based on historical price data.
    2. Support Vector Machines (SVM): SVM is a supervised learning algorithm that can be used for both classification and regression tasks. In the case of coin price prediction, SVM can be used to predict whether the price of a coin will increase or decrease in the future based on historical price data.
    3. Neural Networks: Neural networks are a type of deep learning algorithm that can model complex relationships between inputs and outputs. They are particularly well-suited for tasks involving large amounts of data, such as coin price prediction. By using multiple layers of interconnected neurons, neural networks can learn to recognize patterns and make predictions based on historical price data.
    4. Random Forest: This is an ensemble learning method that combines multiple decision trees to generate more accurate predictions. In the context of coin price prediction, random forest can be used to analyze historical price data and make more accurate predictions about future price movements.
    5. Long Short-Term Memory (LSTM): LSTM is a type of recurrent neural network (RNN) that is designed to learn long-term dependencies in time series data. This makes it particularly well-suited for tasks involving sequential data, such as coin price prediction. By analyzing historical price data, LSTM networks can learn to predict future price movements with greater accuracy than traditional algorithms.

    Mastering Bitcoin Price USD Prediction with Machine Learning

    To master bitcoin price USD prediction with machine learning, you should start by familiarizing yourself with the various machine learning algorithms and techniques available. This will help you understand their strengths and weaknesses and choose the most appropriate algorithm for your specific needs.

    Next, you will need to gather and preprocess historical bitcoin price data. This may involve cleaning the data, removing outliers, and normalizing the data to ensure that the algorithm can process it effectively. You should also consider incorporating additional features, such as market sentiment, trading volume, and global economic trends, to improve the accuracy of your predictions.

    Once you have prepared your data, you can begin training your machine learning model. This may involve split the data into training and testing sets, selecting the appropriate hyperparameters, and training the model on the data. You should monitor the performance of your model during the training process and make adjustments as necessary to ensure that it is learning effectively.

    Finally, you will need to evaluate the performance of your machine learning model on unseen data. This will help you determine its accuracy and reliability and identify any potential areas for improvement. By continuously refining your model and incorporating new data, you can improve your bitcoin price USD predictions and make better-informed trading decisions.

    How to Predict Bitcoin Price Using Machine Learning Trading Bots

    One of the most effective ways to harness the power of machine learning algorithms for bitcoin price prediction is by using machine learning trading bots. These automated trading systems can analyze market data, make predictions, and execute trades on your behalf, allowing you to capitalize on market opportunities without the need for constant monitoring and decision-making.

    To predict bitcoin price using machine learning trading bots, you will need to follow these steps:

    1. Choose a machine learning trading bot: There are many machine learning trading bots available on the market, each with its own set of features and capabilities. Some popular options include Gekko, Zenbot, and Haasbot. Research each bot’s features, pricing, and user reviews to determine the best fit for your needs.
    2. Configure your trading bot: Once you have chosen a machine learning trading bot, you will need to configure it according to your trading strategy and preferences. This may involve setting your preferred trading pairs, setting your risk tolerance, and specifying the machine learning algorithm you want the bot to use for price prediction.
    3. Train your trading bot: Before you can start using your machine learning trading bot for bitcoin price prediction, you will need to train it on historical price data. This will help the bot learn to recognize patterns and make accurate predictions based on the data.
    4. Monitor your trading bot: As your machine learning trading bot begins making predictions and executing trades, it’s essential to monitor its performance and make any necessary adjustments. This may involve tweaking the algorithm, adjusting your risk tolerance, or updating your trading strategy based on market conditions.
    5. Evaluate your trading bot’s performance: Periodically evaluate your trading bot’s performance to ensure that it is making accurate predictions and generating profits. If you notice a decline in performance, consider making changes to your trading strategy or exploring different machine learning algorithms to improve your bitcoin price predictions.

    Evaluating the Effectiveness of Machine Learning Crypto Trading

    To evaluate the effectiveness of machine learning crypto trading, it is essential to consider several factors, including the accuracy and reliability of the predictions, the profitability of the trading strategy, and the overall performance of the machine learning model.

    One common metric for evaluating the accuracy of machine learning algorithms in coin price prediction is the mean absolute error (MAE), which measures the average difference between the predicted and actual prices. A lower MAE indicates a more accurate prediction model. Other useful metrics include the mean squared error (MSE) and the coefficient of determination (R^2), which provide additional information about the model’s accuracy and the goodness of fit.

    When evaluating the profitability of a machine learning crypto trading strategy, it is essential to consider factors such as the return on investment (ROI), the Sharpe ratio, and the maximum drawdown. These metrics can help you assess the performance and risk-adjusted returns of your trading strategy and determine its overall effectiveness.

    Finally, when evaluating the overall performance of a machine learning model, it is crucial to consider factors such as training time, computational complexity, and the model’s ability to adapt to changing market conditions. A successful machine learning crypto trading model should be efficient, adaptable, and capable of generating accurate predictions in a variety of market conditions.

    Top Resources for Learning Machine Learning Cryptocurrency Trading

    If you’re interested in learning more about machine learning cryptocurrency trading, there are several resources available to help you get started. Some of the top resources include:

    1. Books: There are numerous books available on machine learning and cryptocurrency trading, which can provide you with a solid foundation in both subjects. Some popular titles include “Mastering Blockchain” by Imran Bashir, “Python for Data Science Handbook” by Jake VanderPlas, and “Machine Learning for Algorithmic Trading” by Stefan Jansen.
    2. Online courses: Many online platforms offer courses and tutorials on machine learning and cryptocurrency trading. Some popular options include Coursera, Udacity, and edX, which offer courses on machine learning, data science, and blockchain technology.
    3. Blogs and websites: Numerous blogs and websites are dedicated to machine learning and cryptocurrency trading. These resources can provide you with valuable insights, tutorials, and case studies to help you learn and apply machine learning concepts to cryptocurrency trading. Some popular blogs and websites include Towards Data Science, Machine Learning Mastery, and CoinDesk.
    4. Forums and communities: Online forums and communities can provide you with access to like-minded individuals who share your interest in machine learning cryptocurrency trading. Some popular forums and communities include Reddit’s /r/MachineLearning and /r/BitcoinMarkets, as well as the BitcoinTalk and Stack Overflow forums.
    5. Conferences and workshops: Attending conferences and workshops on machine learning and cryptocurrency trading can provide you with valuable networking opportunities and access to cutting-edge research and developments in the field. Some popular conferences and workshops include the Neural Information Processing Systems (NIPS) conference, the International Conference on Learning Representations (ICLR), and various blockchain and cryptocurrency conferences.

    Future Prospects of Machine Learning in the Crypto Market

    The future prospects of machine learning in the crypto market are promising, as advancements in artificial intelligence and data science continue to improve the accuracy and efficiency of coin price prediction models. As more traders and investors adopt machine learning algorithms for their trading strategies, the demand for sophisticated and reliable prediction tools will continue to grow.

    One potential area of growth for machine learning in the crypto market is the development of decentralized machine learning platforms that leverage blockchain technology. This would enable traders and investors to securely share data and prediction models without the need for centralized intermediaries, further enhancing the transparency and trust in the market.

    Additionally, machine learning algorithms may play a crucial role in the development of new financial products and services in the crypto market, such as robo-advisors, automated portfolio management systems, and advanced trading tools. These innovations could help make cryptocurrency trading more accessible and efficient for a broader range of investors.

    Conclusion

    Mastering coin price prediction with machine learning algorithms can provide traders and investors with powerful tools to improve their trading strategies and make better-informed decisions in the crypto market. By harnessing the power of machine learning, blockchain technology, and advanced analytics, you can stay ahead of the competition and capitalize on the immense opportunities in the rapidly evolving world of cryptocurrency trading.

    Categories
    Uncategorized

    Ray Dalio, Ken Griffin, Jim Simons: How do they always beat the market?

    Ok, let’s start with the numbers:

    Ken Griffin’s fund returned 38% in 2022, helping Citadel generate a net gain of $16 billion last year.

    Ray Dalio posted a 32% return through the first half of 2022, while Jim Simons has maintained a 66% average return for over 30 years!

    Have you ever wondered how some of the world’s top investors consistently outperform the market year after year?

    The answer may surprise you – algorithms.

    Jim Simons is known as ‘The Man Who Solved The Market’

    The Power of Algorithms

    Investors such as Ray Dalio, Ken Griffin, and Jim Simons publicly admit that they use algorithms to guide their investment decisions, resulting in significantly higher returns than the overall market.

    Algorithmic trading (or algo trading) is the use of advanced computer programs to make investment decisions by analyzing vast amounts of data to identify patterns and trends.

    But why is algorithmic trading so powerful?

    One reason is that algorithms can analyze data at a speed and scale that humans simply cannot match. They can quickly process information from a wide range of sources and identify profitable trading opportunities that may be overlooked by human traders.

    Additionally, algorithms can operate 24/7, allowing for trades to be executed at any time of the day or night, taking advantage of small market movements around the clock.

    But contrary to what many people think, the algorithms don’t do it all themselves – a human needs to decide on the strategy and the parameters, and the algorithm will simply execute that strategy at the speed of light.

    So credit is due to Ray Dalio, Ken Griffin and Jim Simons for coming up with winning strategies and then building algorithms that can implement those strategies in the markets.

    ‘Convert your principles into algorithms, and let the computer make the decisions alongside you.’ – Ray Dalio

    How do Ray Dalio, Ken Griffin and Jim Simons use algorithms?

    One of Ray Dalio’s funds, Pure Alpha, makes directional bets on various markets including stocks, bonds, commodities and currencies by predicting macroeconomic trends with the help of computer models.

    The fund has long anticipated booms and busts around the world, including the looming financial crisis as early as 2006.

    Similarly, Ken Griffin employs smart mathematicians and scientists at Citadel who harness cutting-edge technology—predictive analytics, machine learning and artificial intelligence—to analyze huge amounts of data in real time that then fuel their decision-making processes.

    Jim Simons, founder of Renaissance Technologies and a mathematician himself, built an investment strategy based on identifying and finding patterns in the market, i.e. movements that repeat over time, so that they become predictable. Once they are identified, their level of reliability is tested through algorithms in so-called backtesting.

    To build such a model, Simons compiled data from the historical records of the World Bank and the Federal Reserve since the 1700s, thus succeeding in unveiling the underlying logic of the operations

    Those examples should help you understand how algorithms can be incredibly powerful if fed with huge amounts of data and guided by solid strategies.

    Citadel’s $16 billion gain in 2022 made Ken Griffin’s flagship the top-earning hedge fund ever.

    How YOU Can Use Algorithms to Improve Your Returns

    The good news is that you don’t have to be a multi-billionaire hedge fund manager to benefit from algorithmic trading.

    In fact, anyone can learn the basics of Algorithmic Trading and build their own trading bot, even if they have no coding experience. That’s why we’re excited to offer a free introductory class on Algorithmic Trading for Beginners.

    > CLICK HERE TO WATCH THE FREE WEBINAR

    In this class, you’ll learn the basics of algorithmic trading and discover how you can use it to your advantage. You’ll learn how to analyze data, identify profitable trading opportunities, and execute trades quickly and efficiently. And best of all, you’ll be able to build your own trading bot even if you’ve never coded before.

    Our introductory class is designed to be beginner-friendly, and you’ll even learn the basics of Python, one of the most popular programming languages used in algorithmic trading. Don’t be discouraged if you have no coding experience, we guarantee you’ll be able to follow along and build your own trading bot!

    So, if you want to start using algorithms like Ray Dalio, Ken Griffin, and Jim Simons, sign up for our free class on Algorithmic Trading for Beginners today.

    Don’t miss this opportunity to learn from the experts and take your trading game to the next level.

    > CLICK HERE TO WATCH THE FREE WEBINAR

    Categories
    Uncategorized

    Unlock the Power of Backtesting: Transform Your Investment Decisions for Maximum Profits!

    If you’re looking to get the most out of your investment decisions and maximize your profits, then backtesting is the tool you need. Backtesting is a powerful tool that allows you to test your trading strategies in a simulated environment. By backtesting a trading strategy, you can find out if it’s viable or not and make necessary adjustments before you start trading with real money. In this article, we’ll be discussing what backtesting is, the benefits of backtesting, and how to backtest a trading strategy.

    What is Backtesting?

    Backtesting is the process of testing a trading strategy against historical data to evaluate its performance. It’s a great way to get a better understanding of how a trading strategy would have performed in the past and identify any potential flaws. By backtesting a trading strategy, you can determine whether it’s worth pursuing or not. This can help you make more informed decisions and maximize your profits.

    Backtesting is commonly used by traders and investors to determine the viability of a trading strategy. It can provide insights into the potential returns, risk, and other performance metrics of a trading strategy. Furthermore, backtesting can help you identify trading opportunities and develop strategies to capitalize on them.

    What are the Benefits of Backtesting?

    Backtesting can provide numerous benefits for traders and investors. Firstly, it can help you identify potential trading opportunities. By backtesting a trading strategy, you can determine how it would have performed in the past and identify any potential flaws. This can help you make more informed decisions and maximize your profits.

    Secondly, backtesting can help you develop more robust trading strategies. By testing a trading strategy against historical data, you can identify any weaknesses and make necessary adjustments to improve the strategy. This can help you develop more robust trading strategies that are better suited to the current market conditions.

    Finally, backtesting can help you reduce your risk. By backtesting a trading strategy, you can identify any potential flaws that could lead to losses. This can help you reduce your risk and ensure that your trading strategies are sound.

    How to Backtest a Trading Strategy

    Backtesting a trading strategy is relatively straightforward. First, you need to identify a trading strategy that you want to test. Then, you need to collect historical data for the assets you want to trade. Next, you need to input the data into a backtesting platform. Finally, you can analyze the results of your backtesting and make necessary adjustments.

    The most important part of backtesting is collecting the right data. You need to ensure that you have enough historical data to accurately test your trading strategy. This typically means having at least a few years worth of data. Additionally, you need to make sure that the data is accurate and up-to-date.

    Once you have the data, you need to input it into a backtesting platform. Most online brokers have backtesting platforms that you can use. These platforms typically have user-friendly interfaces that make it easy to input the data and analyze the results.

    Once the backtesting is complete, you need to analyze the results. You can use the backtesting results to determine the potential returns and risks of a trading strategy. Additionally, you can use the results to identify any potential flaws and make necessary adjustments.

    What Techniques to Use for Backtesting

    Once you have the data, you need to decide which technique to use for backtesting. The most common backtesting technique is Monte Carlo simulation. This technique involves randomly sampling historical data to simulate a trading strategy. This can help you identify any potential flaws in the trading strategy and make necessary adjustments.

    Another technique that you can use is Walk Forward Analysis. This technique involves testing a trading strategy over a period of time and gradually increasing the sample size. This can help you identify any potential flaws in the trading strategy and make necessary adjustments.

    Finally, you can use Machine Learning techniques for backtesting. These techniques involve using algorithms to analyze the historical data and identify potential trading opportunities. Machine Learning techniques can help you identify profitable trading strategies and make more informed decisions.

    Portfolio Backtesting

    Portfolio backtesting is a powerful tool that can help you identify potential trading opportunities and develop robust trading strategies. This technique involves testing a portfolio of assets against historical data to determine the potential returns and risks. This can help you identify any potential flaws in the portfolio and make necessary adjustments.

    Portfolio backtesting can help you identify correlations between different assets and develop diversified portfolios. Additionally, it can help you identify trading opportunities and develop strategies to capitalize on them.

    Backtesting Stocks

    Backtesting stocks is a great way to identify potential trading opportunities and make more informed decisions. This technique involves testing a stock’s performance against historical data to determine the potential returns and risks. This can help you identify any potential flaws in a stock’s performance and make necessary adjustments.

    Backtesting stocks can help you identify profitable trading opportunities and develop robust strategies. Additionally, it can help you identify correlations between different stocks and develop diversified portfolios.

    Backtesting Strategies

    Backtesting strategies can help you identify potential trading opportunities and develop robust strategies. This technique involves testing a trading strategy against historical data to determine the potential returns and risks. This can help you identify any potential flaws in the strategy and make necessary adjustments.

    Backtesting strategies can help you identify profitable trading opportunities and develop robust strategies. Additionally, it can help you identify correlations between different strategies and develop diversified portfolios.

    Backtest Stock Strategies

    Backtest stock strategies is a great way to identify potential trading opportunities and make more informed decisions. This technique involves testing a stock strategy against historical data to determine the potential returns and risks. This can help you identify any potential flaws in the strategy and make necessary adjustments.

    Backtest stock strategies can help you identify profitable trading opportunities and develop robust strategies. Additionally, it can help you identify correlations between different stocks and develop diversified portfolios.

    Software for Backtesting

    There are many software tools available for backtesting your trading strategies. These tools typically have user-friendly interfaces that make it easy to input the data and analyze the results. Additionally, they often have advanced features that can help you identify potential trading opportunities and develop robust strategies.

    Some of the most popular backtesting software tools include TradingView, QuantConnect, and TradeStation. These tools provide powerful backtesting capabilities and can help you identify profitable trading opportunities and develop robust strategies.

    Conclusion

    Backtesting is a powerful tool that can help you get the most out of your investment decisions and maximize your profits. By backtesting a trading strategy, you can determine whether it’s worth pursuing or not and make necessary adjustments before you start trading with real money. Additionally, backtesting can help you identify potential trading opportunities and develop robust strategies to capitalize on them. Click here to sign up for our free trial today and learn how to create your own trading robot using python!

    Categories
    Uncategorized

    How Python for Algorithmic Trading Can Help You Avoid Costly Investing Mistakes!

    Are you looking to get into algorithmic trading but don’t know where to start? Python for algorithmic trading is a powerful tool that can help you take your investing to the next level. In this blog post, we’ll take a look at the benefits of using Python for algorithmic trading, how to build your own algorithmic trading strategy with Python, and strategies for avoiding costly investing mistakes with algorithmic trading. By the end of this post, you’ll have a better understanding of what algorithmic trading is and how to get started using Python for algorithmic trading. So, let’s dive in!

    Introduction to Python for Algorithmic Trading

    Python for algorithmic trading is a programming language that is used for creating automated trading strategies. Algorithmic trading is the process of using a computer program to automatically execute trades based on predetermined criteria. With algorithmic trading, you can create your own trading strategies and automate your trading decisions. This means that you don’t have to manually place trades or monitor the markets 24/7.

    Python is the language of choice for many algorithmic traders because of its flexibility, scalability, and ease of use. Python is a powerful language that allows you to develop robust trading strategies with minimal effort. Additionally, Python is open source, meaning that anyone can use it for free. This makes it the perfect language for algorithmic trading.

    Benefits of Using Python for Algorithmic Trading

    There are many benefits to using Python for algorithmic trading. For starters, Python is easy to learn, making it accessible to traders of all skill levels. Additionally, Python is a powerful language, allowing traders to create complex trading strategies with minimal effort. Furthermore, Python is open source, meaning that it is free to use, making it the perfect language for algorithmic trading.

    Python also offers traders access to a wide range of libraries and frameworks, such as Pandas, NumPy, and TensorFlow, which make it easier to create complex trading strategies. Additionally, Python is an object-oriented language, making it easier to read and understand code. Finally, Python is fast and efficient, allowing traders to develop and backtest their strategies quickly and easily.

    Understanding the Stock Market and Algorithmic Trading Strategies

    Before you can start using Python for algorithmic trading, it’s important to understand the stock market. The stock market is an exchange where traders buy and sell shares of companies. Each share represents a part ownership in the company and can be bought and sold on the stock market.

    Algorithmic trading strategies are computer programs designed to automatically execute trades based on predetermined criteria. These criteria can include factors such as price, volume, and volatility. Algorithmic trading strategies can be used to buy and sell stocks, currencies, or other assets.

    Building your Algorithmic Trading Strategy with Python

    Once you have a basic understanding of the stock market and algorithmic trading strategies, you can start building your own algorithmic trading strategy with Python. One of the first steps is to decide which markets you want to trade in. You can then use the Python programming language to develop a trading strategy that meets your goals.

    When developing your algorithmic trading strategy with Python, it’s important to consider factors such as risk management and market conditions. Additionally, you’ll need to backtest your strategy to ensure that it performs as expected. Backtesting allows you to evaluate the performance of your strategy on historical data and determine if it is profitable.

    Ways to Avoid Costly Investing Mistakes with Python Algorithmic Trading

    Algorithmic trading can help you avoid costly investing mistakes by automating your trading decisions. Automated trading strategies can help you stick to your investing plan and avoid emotional decisions. Additionally, algorithmic trading strategies can help you manage risk by limiting your exposure to the markets.

    It’s important to understand the risks associated with algorithmic trading. Algorithmic trading strategies can be complex and difficult to understand. Additionally, algorithmic trading systems can be susceptible to errors. As such, it’s important to thoroughly test your trading strategies before using them in live trading.

    Strategies for Algorithmic Trading with Python

    Once you have a basic understanding of the stock market and algorithmic trading, you can start developing your own algorithmic trading strategies with Python. One of the most popular algorithmic trading strategies is day trading. Day trading involves opening and closing positions within the same trading day. Day traders use a variety of strategies, such as momentum trading, scalping, and trend following.

    Another popular algorithmic trading strategy is swing trading. Swing trading involves taking longer-term positions, typically lasting several days or weeks. Swing traders often use technical analysis to identify potential trading opportunities. Additionally, swing traders may use fundamental analysis to identify potential trading opportunities.

    Advanced Algorithmic Trading Strategies with Python

    For experienced algorithmic traders, there are a variety of more advanced algorithmic trading strategies that can be used with Python. One of the most popular advanced algorithmic trading strategies is high-frequency trading. High-frequency trading involves taking advantage of small price movements in the markets by executing trades at a rapid pace. High-frequency trading strategies require a high degree of skill and experience.

    Another advanced algorithmic trading strategy is machine learning. Machine learning algorithms use data to identify patterns in the markets and make trading decisions. Machine learning algorithms are often used for more sophisticated trading strategies, such as arbitrage and market making.

    How to Get Started with Algorithmic Trading with Python

    Getting started with algorithmic trading with Python doesn’t have to be difficult. The first step is to learn the basics of the Python programming language. If you’re new to programming, there are a variety of free tutorials and courses available online. Additionally, you can find a variety of free and open source algorithmic trading libraries available online.

    Once you have a basic understanding of Python and algorithmic trading, you can start building your own trading strategies. You can use the Python programming language to develop your own trading strategies or use one of the many open source algorithmic trading libraries available online.

    Courses and Resources for Algorithmic Trading with Python

    If you’re looking for more in-depth courses and resources for algorithmic trading with Python, there are a variety of options available. Many online courses and tutorials are available for free or at a low cost. Additionally, there are a variety of books and online resources available that provide more detailed information on algorithmic trading with Python.

    Sign up for our free trial today and learn how to create your own trading robot using python!

    Conclusion

    Algorithmic trading with Python is a powerful tool that can help you take your investing to the next level. Python is a powerful language that is easy to learn and allows traders to create complex trading strategies with minimal effort. Additionally, Python is open-source, meaning that anyone can use it for free.

    When getting started with algorithmic trading with Python, it’s important to understand the stock market, develop your own trading strategies, and understand the risks associated with algorithmic trading. Additionally, it’s important to thoroughly test your strategies before using them in live trading.

    By following the steps outlined in this blog post, you’ll be well on your way to becoming a successful algorithmic trader using Python. So, what are you waiting for? Get started with algorithmic trading with Python today!

    Categories
    Uncategorized

    Creating The Leveraged Trend Following Stock Trading Algorithm Using Lumibot

    Introduction

    Welcome to this tutorial on how to use the lumibot Python library to create a leveraged trend-following bot. The lumibot library is a powerful tool that allows you to automate your trading strategies and manage your portfolio. This tutorial will guide you through setting up a leveraged trend-following bot using the lumibot library.

    Prerequisites

    Before you can get started with this tutorial, you will need to have the following prerequisites:

    1. A computer with Python 3.7 or higher installed.
    2. A working knowledge of Python programming.
    3. A brokerage account with Alpaca.
    4. The lumibot library installed on your computer. You can install it using the following command:
    pip install lumibot

    Step 1: Import Required Libraries

    The first step in building your leveraged trend-following bot is to import the necessary libraries. This can be done using the following

    import datetime
    
    from lumibot.backtesting import YahooDataBacktesting
    from lumibot.brokers import Alpaca
    from lumibot.entities import Asset, TradingFee
    from lumibot.strategies.strategy import Strategy
    from lumibot.traders import Trader
    

    Step 2: Create the StockLeverageTrendFollowing Strategy Class

    Next, you will need to create a class for your strategy. This class should inherit from the Strategy class provided by the lumibot library. You can do this using the following code:

    class StockLeverageTrendFollowing(Strategy):
        parameters = {
            "symbol": "SPY",
            "leverage_symbol": "UPRO",
            "period_length": 17,
        }
    

    In this code, we define the StockLeverageTrendFollowing class as a subclass of Strategy. We also define three parameters: symbol, leverage_symbol, and period_length. These parameters will be used to customize the behavior of our strategy.

    Step 3: Define the initialize Method

    The initialize method is called when our strategy is first initialized. This is where you can set up any necessary data structures or perform any other setup tasks. In this case, we simply define a sleeptime variable that determines how often our strategy will be run. You can do this using the following code:

    def initialize(self):
            self.sleeptime = "1D"
    

    Step 4: Define the on_trading_iteration Method

    The on_trading_iteration method is called every time our strategy is run. This is where we will define the main logic of our strategy.

    First, we need to retrieve the historical prices for our asset and leverage asset. We can do this using the get_historical_prices method provided by the Strategy class. We also need to calculate the mean and exponential moving average (EMA) of the asset’s close price over the specified period length. You can do this using the following code:

    def on_trading_iteration(self):
            period_length = self.parameters["period_length"]
            symbol = self.parameters["symbol"]
            leverage_symbol = self.parameters["leverage_symbol"]
    
            asset = Asset(symbol=symbol, asset_type="stock")
            leverage_asset = Asset(symbol=leverage_symbol, asset_type="stock")
    
            historical_prices = self.get_historical_prices(
                asset,
                period_length + 1,
                "day",
                quote=self.quote_asset,
            )
            df = historical_prices.df
            ema = df["close"].ewm(span=period_length).mean().iloc[-1]

    Step 5: Check If the Current Price Is Above the EMA

    Now that we have calculated the mean and EMA of the asset’s close price, we can use this information to determine whether the current price is above the EMA. If it is, we will buy the leverage asset. If it is not, we will buy the asset itself.

    First, we retrieve the current price of the asset using the get_last_price method provided by the Strategy class. Then, we check if the current price is greater than or equal to the EMA. If it is, we proceed to the next step. Otherwise, we skip to step 7.

    cur_price = self.get_last_price(asset, quote=self.quote_asset)
    
    if cur_price >= ema:
        # Buy leverage asset
    

    Step 6: Check the Current Positions and Buy the Leverage Asset

    If the current price is above the EMA, we need to check what positions we currently have and decide whether to buy more of the leveraged asset.

    First, we retrieve the current position of the leveraged asset using the get_position method provided by the Strategy class. Then, we calculate the number of shares we can buy using our available cash and the current price of the leveraged asset.

    If we don’t have any position in the leveraged asset, or if our current position is smaller than the number of shares we can buy, we sell all of our current positions using the sell_all method. Then, we create a buy order for the leveraged asset using the create_order method and submit it using the submit_order method.

    # Check what positions we have
    position = self.get_position(leverage_asset)
    price = self.get_last_price(leverage_asset, quote=self.quote_asset)
    quantity = self.cash // price
    
    if position is None or position.quantity < quantity:
        self.sell_all()
        # Buy
        if quantity > 0:
            order = self.create_order(
                leverage_asset,
                quantity,
                "buy",
            )
            self.submit_order(order)
    

    Step 7: Check the Current Positions and Buy the Asset

    If the current price is below the EMA, we need to check what positions we currently have and decide whether to buy more of the asset.

    First, we retrieve the current position of the asset using the get_position method provided by the Strategy class. Then, we calculate the number of shares we can buy using our available cash and the current price of the asset.

    If we don’t have any position in the asset, or if our current position is smaller than the number of shares we can buy, we sell all of our current positions using the sell_all method. Then, we create a buy order for the asset using the create_order method and submit it using the submit_order method.

    else:
      # Check what positions we have
      position = self.get_position(asset)
      price = self.get_last_price(asset, quote=self.quote_asset)
      quantity = self.cash // price
    
      if position is None or position.quantity < quantity:
          self.sell_all()
          # Buy
          if quantity > 0:
              order = self.create_order(
                  asset,
                  quantity,
                  "buy",
              )
              self.submit_order(order)

    Step 8: Test Your Strategy in Backtesting Mode

    Now that you have defined your StockLeverageTrendFollowing strategy class, you can test it in backtesting mode. To do this, you will need to define a main function and set the is_live variable to False.

    In the main function, you will need to specify the start and end dates for your backtest, as well as the trading fees and the period length for your strategy. You can then create an instance of the StockLeverageTrendFollowing class and pass it to the backtest method of the YahooDataBacktesting class.

    Here’s an example of how you can do this:

    if __name__ == "__main__":
        is_live = False
    
        if is_live:
            # Run in live mode
            pass
        else:
            # Backtest this strategy
            backtesting_start = datetime.datetime(2011, 1, 1)
            backtesting_end = datetime.datetime(2022, 11, 10)
    
            # 0.01% trading/slippage fee
            trading_fee = TradingFee(percent_fee=0.0001)
    
            min_period_length = 17
            max_period_length = 17
            period_length = min_period_length
    
            while period_length <= max_period_length:
                StockLeverageTrendFollowing.backtest(
                    YahooDataBacktesting,
                    backtesting_start,
                    backtesting_end,
                    benchmark_asset="SPY",
                    buy_trading_fees=[trading_fee],
                    sell_trading_fees=[trading_fee],
                    parameters={
                        "symbol": "SPY",
                        "leverage_symbol": "UPRO",
                        "period_length": period_length,
                    },
                )
                period_length += 1
    

    This will run your strategy in backtesting mode using historical data from Yahoo Finance. You can then analyze the results to see how your strategy performed.

    Step 9: Run Your Strategy in Live Mode

    If you want to run your strategy in live mode, you will need to set the is_live variable to True and provide your Alpaca API keys. You can then create an instance of the Alpaca class, passing your API keys as arguments.

    Next, create an instance of the StockLeverageTrendFollowing class and pass the Alpaca instance as the broker argument. Finally, create an instance of the Trader class and add your strategy to it using the add_strategy method. You can then run your strategy using the run_all method.

    Here’s an example of how you can do this:

    if __name__ == "__main__":
        is_live = True
    
        if is_live:
            ALPACA_CONFIG_PAPER = {
                # Put your own Alpaca key here:
                "API_KEY": "XXXXXXXXXXXXXXXXXXXX",
                # Put your own Alpaca secret here:
                "API_SECRET": "XXXXXXXXXXXXXXXXXXXXXXXXXXXXXXXXXXXXXXXX",
                # If you want to go live, you must change this
                "ENDPOINT": "https://paper-api.alpaca.markets",
            }
    
            trader = Trader()
            broker = Alpaca(ALPACA_CONFIG_PAPER)
    
            strategy = StockLeverageTrendFollowing(
                broker=broker,
            )
    
            trader.add_strategy(strategy)
            strategy_executors = trader.run_all()
    
        else:
            # Backtest this strategy
            pass

    Conclusion

    In this tutorial, you learned how to use the lumibot Python library to create a leveraged trend following bot. You saw how to import the necessary libraries, create a StockLeverageTrendFollowing strategy class, and define the initialize and on_trading_iteration methods. You also learned how to test your strategy in backtesting mode and run it in live mode using Alpaca.

    I hope you found this tutorial helpful. If you have any questions or need further assistance, please don’t hesitate to ask.

    Additionally, if you’re interested in learning more about algorithmic trading, be sure to check out our free class on the subject at the following link:

    This class covers the basics of algorithmic trading and will give you a solid foundation to build upon as you continue to learn and develop your trading skills.

    The Full Code

    Here is the full code for you to copy/paste:

    import datetime
    
    from lumibot.backtesting import YahooDataBacktesting
    from lumibot.brokers import Alpaca
    from lumibot.entities import Asset, TradingFee
    from lumibot.strategies.strategy import Strategy
    from lumibot.traders import Trader
    
    
    class StockLeverageTrendFollowing(Strategy):
        parameters = {
            "symbol": "SPY",
            "leverage_symbol": "UPRO",
            "period_length": 17,
        }
    
        def initialize(self):
            self.sleeptime = "1D"
    
        def on_trading_iteration(self):
            period_length = self.parameters["period_length"]
            symbol = self.parameters["symbol"]
            leverage_symbol = self.parameters["leverage_symbol"]
    
            asset = Asset(symbol=symbol, asset_type="stock")
            leverage_asset = Asset(symbol=leverage_symbol, asset_type="stock")
    
            historical_prices = self.get_historical_prices(
                asset,
                period_length + 1,
                "day",
                quote=self.quote_asset,
            )
            df = historical_prices.df
            ema = df["close"].ewm(span=period_length).mean().iloc[-1]
            cur_price = self.get_last_price(asset, quote=self.quote_asset)
    
            if cur_price >= ema:
                # Check what positions we have
                position = self.get_position(leverage_asset)
                price = self.get_last_price(leverage_asset, quote=self.quote_asset)
                quantity = self.cash // price
    
                if position is None or position.quantity < quantity:
                    self.sell_all()
                    # Buy
                    if quantity > 0:
                        order = self.create_order(
                            leverage_asset,
                            quantity,
                            "buy",
                        )
                        self.submit_order(order)
    
            else:
                # Check what positions we have
                position = self.get_position(asset)
                price = self.get_last_price(asset, quote=self.quote_asset)
                quantity = self.cash // price
    
                if position is None or position.quantity < quantity:
                    self.sell_all()
                    # Buy
                    if quantity > 0:
                        order = self.create_order(
                            asset,
                            quantity,
                            "buy",
                        )
                        self.submit_order(order)
    
    
    if __name__ == "__main__":
        is_live = False
    
        if is_live:
            ALPACA_CONFIG_PAPER = {
                # Put your own Alpaca key here:
                "API_KEY": "XXXXXXXXXXXXXXXXXXXX",
                # Put your own Alpaca secret here:
                "API_SECRET": "XXXXXXXXXXXXXXXXXXXXXXXXXXXXXXXXXXXXXXXX",
                # If you want to go live, you must change this
                "ENDPOINT": "https://paper-api.alpaca.markets",
            }
    
            trader = Trader()
            broker = Alpaca(ALPACA_CONFIG_PAPER)
    
            strategy = StockLeverageTrendFollowing(
                broker=broker,
            )
    
            trader.add_strategy(strategy)
            strategy_executors = trader.run_all()
    
        else:
            # Backtest this strategy
            backtesting_start = datetime.datetime(2011, 1, 1)
            backtesting_end = datetime.datetime(2022, 11, 10)
    
            # 0.01% trading/slippage fee
            trading_fee = TradingFee(percent_fee=0.0001)
    
            min = 17
            max = 17
            period_length = min
    
            while period_length <= max:
                StockLeverageTrendFollowing.backtest(
                    YahooDataBacktesting,
                    backtesting_start,
                    backtesting_end,
                    benchmark_asset="SPY",
                    buy_trading_fees=[trading_fee],
                    sell_trading_fees=[trading_fee],
                    parameters={"period_length": period_length},
                    name=f"stock-leverage-trend-following-{period_length}",
                )
    
                period_length += 1
    

    The Backtesting Results

    Here are the results from backtesting this algorithm, as you can see it significantly outperforms the SPY (S&P 500) benchmark