Introduction
Welcome to this tutorial on how to use the lumibot Python library to create a leveraged trend-following bot. The lumibot library is a powerful tool that allows you to automate your trading strategies and manage your portfolio. This tutorial will guide you through setting up a leveraged trend-following bot using the lumibot library.
Prerequisites
Before you can get started with this tutorial, you will need to have the following prerequisites:
- A computer with Python 3.7 or higher installed.
- A working knowledge of Python programming.
- A brokerage account with Alpaca.
- The lumibot library installed on your computer. You can install it using the following command:
pip install lumibotStep 1: Import Required Libraries
The first step in building your leveraged trend-following bot is to import the necessary libraries. This can be done using the following
import datetime

from lumibot.backtesting import YahooDataBacktesting
from lumibot.brokers import Alpaca
from lumibot.entities import Asset, TradingFee
from lumibot.strategies.strategy import Strategy
from lumibot.traders import Trader
Step 2: Create the StockLeverageTrendFollowing Strategy Class
Next, you will need to create a class for your strategy. This class should inherit from the Strategy class provided by the lumibot library. You can do this using the following code:
class StockLeverageTrendFollowing(Strategy):
    parameters = {
        "symbol": "SPY",
        "leverage_symbol": "UPRO",
        "period_length": 17,
    }
In this code, we define the StockLeverageTrendFollowing class as a subclass of Strategy. We also define three parameters: symbol, leverage_symbol, and period_length. These parameters will be used to customize the behavior of our strategy.
Step 3: Define the initialize Method
The initialize method is called when our strategy is first initialized. This is where you can set up any necessary data structures or perform any other setup tasks. In this case, we simply define a sleeptime variable that determines how often our strategy will be run. You can do this using the following code:
def initialize(self):
        self.sleeptime = "1D"
Step 4: Define the on_trading_iteration Method
The on_trading_iteration method is called every time our strategy is run. This is where we will define the main logic of our strategy.
First, we need to retrieve the historical prices for our asset and leverage asset. We can do this using the get_historical_prices method provided by the Strategy class. We also need to calculate the mean and exponential moving average (EMA) of the asset’s close price over the specified period length. You can do this using the following code:
def on_trading_iteration(self):
        period_length = self.parameters["period_length"]
        symbol = self.parameters["symbol"]
        leverage_symbol = self.parameters["leverage_symbol"]

        asset = Asset(symbol=symbol, asset_type="stock")
        leverage_asset = Asset(symbol=leverage_symbol, asset_type="stock")

        historical_prices = self.get_historical_prices(
            asset,
            period_length + 1,
            "day",
            quote=self.quote_asset,
        )
        df = historical_prices.df
        ema = df["close"].ewm(span=period_length).mean().iloc[-1]
Step 5: Check If the Current Price Is Above the EMA
Now that we have calculated the mean and EMA of the asset’s close price, we can use this information to determine whether the current price is above the EMA. If it is, we will buy the leverage asset. If it is not, we will buy the asset itself.
First, we retrieve the current price of the asset using the get_last_price method provided by the Strategy class. Then, we check if the current price is greater than or equal to the EMA. If it is, we proceed to the next step. Otherwise, we skip to step 7.
cur_price = self.get_last_price(asset, quote=self.quote_asset)

if cur_price >= ema:
    # Buy leverage asset
Step 6: Check the Current Positions and Buy the Leverage Asset
If the current price is above the EMA, we need to check what positions we currently have and decide whether to buy more of the leveraged asset.
First, we retrieve the current position of the leveraged asset using the get_position method provided by the Strategy class. Then, we calculate the number of shares we can buy using our available cash and the current price of the leveraged asset.
If we don’t have any position in the leveraged asset, or if our current position is smaller than the number of shares we can buy, we sell all of our current positions using the sell_all method. Then, we create a buy order for the leveraged asset using the create_order method and submit it using the submit_order method.
# Check what positions we have
position = self.get_position(leverage_asset)
price = self.get_last_price(leverage_asset, quote=self.quote_asset)
quantity = self.cash // price

if position is None or position.quantity < quantity:
    self.sell_all()
    # Buy
    if quantity > 0:
        order = self.create_order(
            leverage_asset,
            quantity,
            "buy",
        )
        self.submit_order(order)
Step 7: Check the Current Positions and Buy the Asset
If the current price is below the EMA, we need to check what positions we currently have and decide whether to buy more of the asset.
First, we retrieve the current position of the asset using the get_position method provided by the Strategy class. Then, we calculate the number of shares we can buy using our available cash and the current price of the asset.
If we don’t have any position in the asset, or if our current position is smaller than the number of shares we can buy, we sell all of our current positions using the sell_all method. Then, we create a buy order for the asset using the create_order method and submit it using the submit_order method.
else:
  # Check what positions we have
  position = self.get_position(asset)
  price = self.get_last_price(asset, quote=self.quote_asset)
  quantity = self.cash // price

  if position is None or position.quantity < quantity:
      self.sell_all()
      # Buy
      if quantity > 0:
          order = self.create_order(
              asset,
              quantity,
              "buy",
          )
          self.submit_order(order)
Step 8: Test Your Strategy in Backtesting Mode
Now that you have defined your StockLeverageTrendFollowing strategy class, you can test it in backtesting mode. To do this, you will need to define a main function and set the is_live variable to False.
In the main function, you will need to specify the start and end dates for your backtest, as well as the trading fees and the period length for your strategy. You can then create an instance of the StockLeverageTrendFollowing class and pass it to the backtest method of the YahooDataBacktesting class.
Here’s an example of how you can do this:
if __name__ == "__main__":
    is_live = False

    if is_live:
        # Run in live mode
        pass
    else:
        # Backtest this strategy
        backtesting_start = datetime.datetime(2011, 1, 1)
        backtesting_end = datetime.datetime(2022, 11, 10)

        # 0.01% trading/slippage fee
        trading_fee = TradingFee(percent_fee=0.0001)

        min_period_length = 17
        max_period_length = 17
        period_length = min_period_length

        while period_length <= max_period_length:
            StockLeverageTrendFollowing.backtest(
                YahooDataBacktesting,
                backtesting_start,
                backtesting_end,
                benchmark_asset="SPY",
                buy_trading_fees=[trading_fee],
                sell_trading_fees=[trading_fee],
                parameters={
                    "symbol": "SPY",
                    "leverage_symbol": "UPRO",
                    "period_length": period_length,
                },
            )
            period_length += 1
This will run your strategy in backtesting mode using historical data from Yahoo Finance. You can then analyze the results to see how your strategy performed.
Step 9: Run Your Strategy in Live Mode
If you want to run your strategy in live mode, you will need to set the is_live variable to True and provide your Alpaca API keys. You can then create an instance of the Alpaca class, passing your API keys as arguments.
Next, create an instance of the StockLeverageTrendFollowing class and pass the Alpaca instance as the broker argument. Finally, create an instance of the Trader class and add your strategy to it using the add_strategy method. You can then run your strategy using the run_all method.
Here’s an example of how you can do this:
if __name__ == "__main__":
    is_live = True

    if is_live:
        ALPACA_CONFIG_PAPER = {
            # Put your own Alpaca key here:
            "API_KEY": "XXXXXXXXXXXXXXXXXXXX",
            # Put your own Alpaca secret here:
            "API_SECRET": "XXXXXXXXXXXXXXXXXXXXXXXXXXXXXXXXXXXXXXXX",
            # If you want to go live, you must change this
            "ENDPOINT": "https://paper-api.alpaca.markets",
        }

        trader = Trader()
        broker = Alpaca(ALPACA_CONFIG_PAPER)

        strategy = StockLeverageTrendFollowing(
            broker=broker,
        )

        trader.add_strategy(strategy)
        strategy_executors = trader.run_all()

    else:
        # Backtest this strategy
        pass
Conclusion
In this tutorial, you learned how to use the lumibot Python library to create a leveraged trend following bot. You saw how to import the necessary libraries, create a StockLeverageTrendFollowing strategy class, and define the initialize and on_trading_iteration methods. You also learned how to test your strategy in backtesting mode and run it in live mode using Alpaca.
I hope you found this tutorial helpful. If you have any questions or need further assistance, please don’t hesitate to ask.
Additionally, if you’re interested in learning more about algorithmic trading, be sure to check out our free class on the subject at the following link:
This class covers the basics of algorithmic trading and will give you a solid foundation to build upon as you continue to learn and develop your trading skills.
The Full Code
Here is the full code for you to copy/paste:
import datetime

from lumibot.backtesting import YahooDataBacktesting
from lumibot.brokers import Alpaca
from lumibot.entities import Asset, TradingFee
from lumibot.strategies.strategy import Strategy
from lumibot.traders import Trader


class StockLeverageTrendFollowing(Strategy):
    parameters = {
        "symbol": "SPY",
        "leverage_symbol": "UPRO",
        "period_length": 17,
    }

    def initialize(self):
        self.sleeptime = "1D"

    def on_trading_iteration(self):
        period_length = self.parameters["period_length"]
        symbol = self.parameters["symbol"]
        leverage_symbol = self.parameters["leverage_symbol"]

        asset = Asset(symbol=symbol, asset_type="stock")
        leverage_asset = Asset(symbol=leverage_symbol, asset_type="stock")

        historical_prices = self.get_historical_prices(
            asset,
            period_length + 1,
            "day",
            quote=self.quote_asset,
        )
        df = historical_prices.df
        ema = df["close"].ewm(span=period_length).mean().iloc[-1]
        cur_price = self.get_last_price(asset, quote=self.quote_asset)

        if cur_price >= ema:
            # Check what positions we have
            position = self.get_position(leverage_asset)
            price = self.get_last_price(leverage_asset, quote=self.quote_asset)
            quantity = self.cash // price

            if position is None or position.quantity < quantity:
                self.sell_all()
                # Buy
                if quantity > 0:
                    order = self.create_order(
                        leverage_asset,
                        quantity,
                        "buy",
                    )
                    self.submit_order(order)

        else:
            # Check what positions we have
            position = self.get_position(asset)
            price = self.get_last_price(asset, quote=self.quote_asset)
            quantity = self.cash // price

            if position is None or position.quantity < quantity:
                self.sell_all()
                # Buy
                if quantity > 0:
                    order = self.create_order(
                        asset,
                        quantity,
                        "buy",
                    )
                    self.submit_order(order)


if __name__ == "__main__":
    is_live = False

    if is_live:
        ALPACA_CONFIG_PAPER = {
            # Put your own Alpaca key here:
            "API_KEY": "XXXXXXXXXXXXXXXXXXXX",
            # Put your own Alpaca secret here:
            "API_SECRET": "XXXXXXXXXXXXXXXXXXXXXXXXXXXXXXXXXXXXXXXX",
            # If you want to go live, you must change this
            "ENDPOINT": "https://paper-api.alpaca.markets",
        }

        trader = Trader()
        broker = Alpaca(ALPACA_CONFIG_PAPER)

        strategy = StockLeverageTrendFollowing(
            broker=broker,
        )

        trader.add_strategy(strategy)
        strategy_executors = trader.run_all()

    else:
        # Backtest this strategy
        backtesting_start = datetime.datetime(2011, 1, 1)
        backtesting_end = datetime.datetime(2022, 11, 10)

        # 0.01% trading/slippage fee
        trading_fee = TradingFee(percent_fee=0.0001)

        min = 17
        max = 17
        period_length = min

        while period_length <= max:
            StockLeverageTrendFollowing.backtest(
                YahooDataBacktesting,
                backtesting_start,
                backtesting_end,
                benchmark_asset="SPY",
                buy_trading_fees=[trading_fee],
                sell_trading_fees=[trading_fee],
                parameters={"period_length": period_length},
                name=f"stock-leverage-trend-following-{period_length}",
            )

            period_length += 1
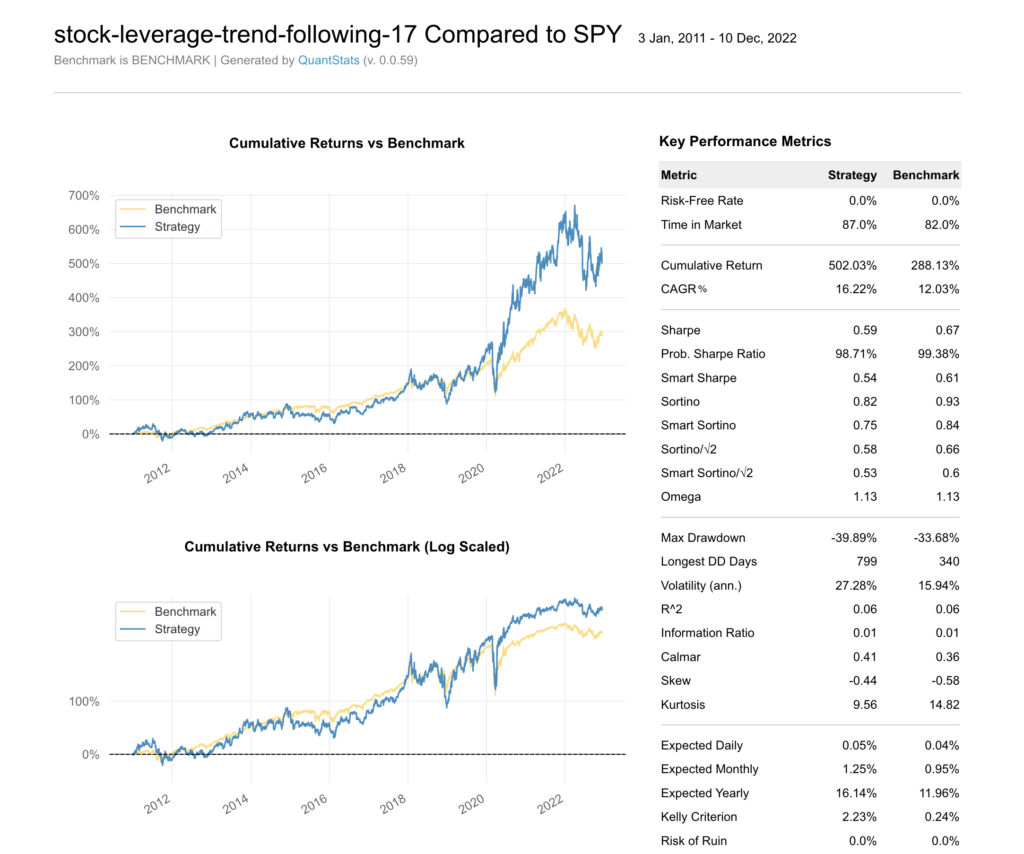
The Backtesting Results
Here are the results from backtesting this algorithm, as you can see it significantly outperforms the SPY (S&P 500) benchmark